Java Applet and Java Web Start Deployment Guide
Writing Diagnostic Information to Standard Output and Error Streams
A Java applet can write messages to the standard output and standard error streams. When debugging a Java applet, writing diagnostic information to the standard output can be a valuable tool.
The following code snippet writes messages to the standard output stream and standard error stream.
// Where instance variables are declared:
boolean DEBUG = true;
// ...
// Later, when we want to print some status:
if (DEBUG) {
    try {
        // ...
        //some code that throws an exception
        System.out.println("Called someMethod(" + x + "," + y + ")");
    } catch (Exception e) {
        e.printStackTrace();
    }
}
Check the Java console log to view messages written to the standard output stream or standard error stream. To store messages in a log file, enable logging in the Java Control Panel. Messages will be written to a log file in the user's home directory (for example, on Windows, the log file might be at C:\Documents and Settings\someuser\Application Data\Sun\Java\Deployment\log).
Note: Before releasing an applet, be sure to disable all debug output.
Developing a Draggable Applet
A Java applet deployed with the draggable parameter can be dragged outside the browser and dynamically converted into a Java Web Start application. The applet can be dragged by pressing the Alt key and left mouse button and dragging the mouse. When the drag operation starts, the applet is removed from its parent container (Applet or JApplet) and placed in a new undecorated top-level window (Frame or JFrame). A small floating close button appears next to the dragged applet. Clicking the floating close button returns the applet to the browser. Java applets that can be dragged out of the browser are henceforth referred to as draggable applets.
You can customize the behavior of draggable applets in the following ways:
- You can change the key and mouse button sequence used to drag the applet out of the browser.
- You can add a desktop shortcut to launch the application outside the browser.
- You can define how the applet should close when dragged out of the browser.
The following sections describe how to implement and customize draggable applets. The MenuChooserApplet class is used to demonstrate the development and deployment of draggable applets. Open AppletPage.html in a browser to view the menu chooser applet on a new page.
Note: If you cannot see the applet running, install at least Java SE Development Kit (JDK) 6 update 10.
Note: If you cannot see the example running, ensure that the JavaScript interpreter is enabled in your browser so that the deployment toolkit script can run correctly.
Enabling Applet Dragging
You can enable applet dragging by setting the draggable parameter to true when deploying the applet, as shown in the following code snippet:
<script src="https://www.java.com/js/deployJava.js"></script>
<script>
    var attributes = { code:'MenuChooserApplet', width:900, height:300 };
    var parameters = { jnlp_href: 'draggableapplet.jnlp', draggable: 'true' };
    deployJava.runApplet(attributes, parameters, '1.6');
</script>
Changing the Key and Mouse Button Sequence for Dragging
You can change the key and mouse button sequence used to drag the applet by implementing the isAppletDragStart method. In the following code snippet, the applet can be dragged by pressing the left mouse button and dragging:
public boolean isAppletDragStart(MouseEvent e) {
    if(e.getID() == MouseEvent.MOUSE_DRAGGED) {
        return true;
    } else {
        return false;
    }
}
Adding a Desktop Shortcut When the Applet Disconnects from the Browser
If the user closes the browser window or leaves the page after dragging the applet out of the page, the applet is said to have disconnected from the browser. When the applet disconnects from the browser, you can create a desktop shortcut for the applet. The desktop shortcut can be used to launch the application outside the browser. To enable the creation of a desktop shortcut, add the offline-allowed and shortcut tags to the applet's Java Network Launch Protocol (JNLP) file.
<information>
    <!-- ... -->
    <offline-allowed />
    <shortcut online="false">
        <desktop />
    </shortcut>
</information>
Note: Depending on the user's shortcut creation settings in the Java Control Panel, the user may be prompted for confirmation before the shortcut is created.
Defining How the Applet Closes
You can define how your applet closes. For example, your Swing applet can have a JButton to close the applet instead of relying on the default floating close button.
The Java Plug-in software provides an instance of the ActionListener class for the applet. This instance of the ActionListener class, also called the close listener, can be used to modify the default close behavior of the applet.
To define how the applet closes, implement the setAppletCloseListener and appletRestored methods in your applet.
In the following code snippet, the MenuChooserApplet class receives the close listener and passes it to an instance of the MenuItemChooser class:
MenuItemChooser display = null;
// ...
display = new MenuItemChooser();
// ...
public void setAppletCloseListener(ActionListener cl) {
    display.setCloseListener(cl);
}

public void appletRestored() {
    display.setCloseListener(null);
}
The MenuItemChooser class is responsible for controlling the applet's user interface. The MenuItemChooser class defines a JButton labeled "Close". When the user clicks this Close button, the following code executes:
private void close() {
    // invoke actionPerformed of closeListener received
    // from the Java Plug-in software.
    if (closeListener != null) {
        closeListener.actionPerformed(null);
    }
}
Requesting and Customizing Applet Decoration
Starting from the Java SE 7 release, when deploying an applet, you can specify that the dragged applet window should be decorated with a default or custom window title.
To enable window decoration for the dragged applet, use the java_decorated_frame parameter with a value of "true". Also specify the java_applet_title parameter to enable a custom window title. The value of this parameter should be the text of the window title.
<script src="https://www.java.com/js/deployJava.js"></script>
<script>
    var attributes =
      { code:'SomeDraggableApplet', width:100, height:100 };
    var parameters =
      { jnlp_href: 'somedraggableapplet.jnlp',
          java_decorated_frame: 'true',
          java_applet_title: 'A Custom Title'
      };
    deployJava.runApplet(attributes, parameters, '1.7');
</script>
The java_decorated_frame and java_applet_title parameters can also be specified in the applet's JNLP file, as shown in the following code snippet:
<applet-desc main-class="SayHello" name="main test" height="150" width="300">
    <param name="java_decorated_frame" value="true" />
    <param name="java_applet_title" value="" />
</applet-desc>
Download the source code to further experiment with the Draggable Applet example.
Communicating with Other Applets
A Java applet can communicate with other Java applets by using JavaScript functions in the parent web page. The JavaScript functions enable communication between applets by receiving messages from one applet and calling methods of other applets. For more information on how Java code interacts with JavaScript code, see the following topics:
- Calling JavaScript Code from an Applet
- Calling Applet Methods from JavaScript Code
You should avoid using the following mechanisms to find other applets and share data between applets:
- Avoid using static variables to share data between applets.
- Do not use the
getAppletandgetAppletsmethods of theAppletContextclass to find other applets. These methods can only find applets running in the same Java Runtime Environment software instance.
Applets must be from the same directory on the server to communicate with each other.
The sender and receiver applets are shown below. When the user clicks the button to increment the counter, the sender applet calls a JavaScript function to send a request to the receiver applet. The receiver applet increments a counter variable and displays the value of the variable after receiving the request.
function sendMsgToIncrementCounter() {
    var myReceiver = document.getElementById("receiver");
    myReceiver.incrementCounter();
}
Sender Applet
<script>
    var attributes = { code:'Sender.class',
        archive:'examples/dist/applet_SenderReceiver/applet_SenderReceiver.jar',
        width:300, height:50} ;
    var parameters = { permissions:'sandbox' };
    deployJava.runApplet(attributes, parameters, '1.6');
</script>
Receiver Applet
<script>
    var attributes = { id:'receiver', code:'Receiver.class',
        archive:'examples/dist/applet_SenderReceiver/applet_SenderReceiver.jar',
        width:300, height:50} ;
    var parameters = { permissions:'sandbox' };
    deployJava.runApplet(attributes, parameters, '1.6');
</script>
Note: If you cannot see the applet running, install at least Java SE Development Kit (JDK) 6 update 10.
Note: If you cannot see the example running, ensure that the JavaScript interpreter is enabled in your browser so that the deployment toolkit script can run correctly.
To enable communication with another applet, obtain a reference to an instance of the netscape.javascript.JSObject class. Use this instance to call JavaScript functions. The Sender applet uses an instance of the netscape.javascript.JSObject class to call a JavaScript function named sendMsgToIncrementCounter.
try {
    JSObject window = JSObject.getWindow(this);
    window.eval("sendMsgToIncrementCounter()");
} catch (JSException jse) {
    // ...
}
Note: To compile Java code that has references to classes in the netscape.javascript package, include <your JDK path>/jre/lib/plugin.jar in the classpath. At runtime, the Java Plug-in software automatically makes these classes available to the applet.
Write the JavaScript function that will receive a request from one applet and call a method of another applet on the web page. The sendMsgToIncrementCounter JavaScript function calls the incrementCounter method of the receiver applet.
<script>
    function sendMsgToIncrementCounter() {
        var myReceiver = document.getElementById("receiver");
        myReceiver.incrementCounter();
    }
</script>
Note that the JavaScript code uses the name receiver to get a reference to the receiver applet on the web page. This name should be the same as the value of the id attribute specified when deploying the receiver applet.
The incrementCounter method of the Receiver applet is shown below.
public void incrementCounter() {
    ctr++;
    String text = " Current Value Of Counter: "
        + (new Integer(ctr)).toString();
    ctrLbl.setText(text);
}
Deploy the applets on a web page as shown in the following code snippet. You can view the sender and receiver applets and the associated JavaScript code in AppletPage.html.
<!-- Sender Applet -->
<script src="https://www.java.com/js/deployJava.js"></script>
<script>
    var attributes = { code:'Sender.class',
        archive:'examples/dist/applet_SenderReceiver/applet_SenderReceiver.jar',
        width:300, height:50} ;
    var parameters = { permissions:'sandbox' };
    deployJava.runApplet(attributes, parameters, '1.6');
</script>

<!-- Receiver Applet -->
<script>
    var attributes = { id:'receiver', code:'Receiver.class',
        archive:'examples/dist/applet_SenderReceiver/applet_SenderReceiver.jar',
        width:300, height:50} ;
    var parameters = { permissions:'sandbox' };
    deployJava.runApplet(attributes, parameters, '1.6');
</script>
Download the source code for further experimentation with the Sender Receiver Applet example.
Working with Server-Side Applications
Java applets can communicate over a network using the APIs defined in the java.net package, just like any other Java program. Java applets can communicate with server applications running on the same host as the applet. This type of communication does not require any special setup on the server.
Note: Depending on the network environment in which the applet is loaded and the browser running the applet, the applet may not be able to communicate with its source host. For example, a browser running on a host inside a firewall often cannot obtain much information about the outside world beyond the firewall. As a result, some browsers may not allow applets to communicate with hosts outside the firewall.
When an applet is deployed to a web server, use the getCodeBase method of the Applet class and the getHost method of java.net.URL to determine the host from which the applet came, as shown below:
String host = getCodeBase().getHost();
If the applet is deployed locally, the getCodeBase method returns null. It is recommended to use a web server.
Once you have the correct host name, you can use all the networking code documented in the Custom Networking tutorial.
Note: Not all browsers support all networking code perfectly. For example, a widely-used browser compatible with Java technology does not support posting content to a URL.
For an example of an applet that acts as a network client, see the Neetwork Client Applet Example.
Network Client Applet Example
The QuoteClientApplet class allows you to get quotes from a server-side application running on the same host as this applet. The class also displays the quotes received from the server.
The QuoteServer.java and QuoteServerThread.java classes constitute the server-side application that returns quotes. There is a text file (one-liners.txt) that contains many quotes.
Perform the following steps to test the QuoteClientApplet.
-
Download and save the following files to your local computer.
QuoteClientAppletQuoteServer.javaQuoteServerThread.javaone-liners.txtquoteApplet.html
-
Include the following HTML code in a web page to deploy the
QuoteClientApplet.
<script src="https://www.java.com/js/deployJava.js"></script>
<script>
    var attributes = { code:'QuoteClientApplet.class',  width:500, height:100} ;
    var parameters = { codebase_lookup:'true', permissions:'sandbox' };
    deployJava.runApplet(attributes, parameters, '1.6');
</script>
Alternatively, you can use the quoteApplet.html page that already contains this HTML code.
-
Compile the
QuoteClientApplet.javaclass. Copy the resulting class file to the same directory where you saved the web page. -
Compile the server-side application classes,
QuoteServer.javaandQuoteServerThread.java. -
Copy the file
one-liners.txtto the directory with the server-side application class files (generated in the previous step). -
Start the server-side application.
java QuoteServer
You should see a message with a port number, as shown in the following example. Note the port number.
QuoteServer listening on port:3862
-
Open the web page containing the applet in a browser by entering the URL of the web page. The host name in the URL should be the same as the host name where the server-side application is running.
For example, if the server-side application runs on a computer named
JohnDoeMachine, you should enter a URL similar to the following. The exact port number and path will vary depending on your web server setup.
http://JohnDoeMachine:8080/quoteApplet/quoteApplet.html
The QuoteClientApplet will be displayed on the web page.
- Enter the port number of the server-side application in the applet's text field and click "OK". A quote will be displayed.
This is a screenshot of the applet running.
 QuoteServer example output
What Applets Can and Cannot Do
When a user visits a page that contains an applet, the Java applet is loaded on the client. The security model behind Java applets is designed to protect users from malicious applets.
Applets can be sandbox applets or privileged applets. Sandbox applets run in a security sandbox that only allows a set of safe operations. Privileged applets can run outside the security sandbox and have extensive access to the client.
Unsigned applets are restricted to the security sandbox and only run if the user accepts the applet. Applets signed by a recognized certificate authority can run in the security sandbox or can request permission to run outside the security sandbox. In any case, the user must accept the applet's security certificate, otherwise the applet will be blocked from running.
It is recommended that you use the Java Network Launch Protocol (JNLP) to launch your applets to leverage extended features and improve user experience. For step-by-step instructions on applet deployment, see Deploying an Applet.
It is recommended that you deploy your applet to a web server, even for testing. To run an applet locally, add the applet to the exception site list, which can be managed from the Security tab of the Java Control Panel.
In this topic, we discuss the security restrictions and capabilities of applets.
Sandbox Applets
Sandbox applets are restricted to the security sandbox and can perform the following operations:
- They can make network connections to the host and port they came from. The protocol must match, and if the applet was loaded using a domain name, it must connect back to the host using the domain name, not the IP address.
- Using the
showDocumentmethod of thejava.applet.AppletContextclass, they can easily display HTML documents. - They can call public methods of other applets on the same page.
- Applets loaded from the local file system (directories in the user's
CLASSPATH) do not have any restrictions that network-loaded applets have. - They can read secure system properties. For a list of secure system properties, see System Properties.
- When launched with JNLP, sandbox applets can also perform the following operations:
- They can open, read, and save files on the client.
- They can access the shared system clipboard.
- They can access printing functionality.
- They can store data on the client, determine how to download and cache the applet, etc. For more information on developing applets using the JNLP API, see JNLP API.
Sandbox applets cannot perform the following operations:
- They cannot access client resources such as the local file system, executable files, system clipboard, and printer.
- They cannot connect to or retrieve resources from any third-party server (any server other than their source server).
- They cannot load native libraries.
- They cannot change the SecurityManager.
- They cannot create a ClassLoader.
- They cannot read certain system properties. See System Properties for a list of prohibited system properties.
Privileged Applets
Privileged applets are not subject to the security restrictions enforced on sandbox applets and can run outside the security sandbox.
Note: JavaScript code is treated as unsigned code. When a privileged applet is accessed from JavaScript code in an HTML page, the applet executes within the security sandbox. This means that the privileged applet essentially behaves like a sandbox applet.
See Security in Rich Internet Applications for information on how to handle applets.
Additional Information
For more information on applet security warning dialogs, see Exploring the Security Warning feature (article on oracle.com/technetwork)
Solving Common Applet Problems
This section covers some common problems you might encounter when writing Java applets. Each problem is followed by possible causes and solutions.
Problem: My applet is not displayed.
- Check the Java console log for errors.
- Check the syntax of the applet's Java Network Launch Protocol (JNLP) file. An incorrect JNLP file is the most common cause of failure without an obvious error.
- If deploying using the deployment toolkit's
runAppletfunction, check the JavaScript syntax. For more information, see Deploying an Applet.
Problem: The Java console log shows java.lang.ClassNotFoundException.
- Ensure your Java source files compiled correctly.
- If deploying with the
<applet>tag, check the path in thearchiveattribute for the applet's JAR file. - If launching with a JNLP file, check the path in the
jartag in the JNLP file. - Ensure that the applet's JAR file, JNLP file, and web page are in the correct directories and reference each other accurately.
Problem: I used to be able to build the code, but now the build fails even without compilation errors.
- Close the browser and re-run the build. The browser likely locked the JAR file, preventing the build process from regenerating the JAR file.
Problem: When I try to load a web page that contains an applet, my browser redirects me to www.java.com without any warning.
- The applet on the web page is likely deployed using the deployment toolkit script. The applet may require a higher version of the Java Runtime Environment software than what is currently present on the client. Check the
minimumVersionparameter of therunAppletfunction in the applet's web page. For more information, see Deploying an Applet.
Problem: I fixed some bugs and rebuilt my applet source code. When I reload the applet's web page, my fixes are not visible.
- You might be viewing a previously cached version of the applet. Close the browser. Open the Java Control Panel and delete temporary internet files. This will remove your applet from the cache. Try viewing your applet again.
Questions and Exercises: Applets
Questions
- Which classes can an applet inherit?
- How do you use the
start()method? - True or False: An applet can make network connections to any host on the internet.
- How do you obtain the value of a parameter specified in the JNLP file from the applet's code?
- Which class enables applets to interact with JavaScript code in the applet's web page?
- True or False: Applets can modify the content of the parent web page.
Exercises
- The parent web page of the
Exerciseapplet has a JavaScript variable namedmemberId. Write the code in the applet'sstartmethod to set the value ofmemberIdto "123489".
Check your answers.
Tutorial: Java Web Start
Java Web Start software provides a one-click launch capability to start full-featured applications. Users can download and launch applications, such as a complete spreadsheet program or an internet chat client, without going through a lengthy installation process.
With Java Web Start software, users can launch Java applications by clicking a link in a web page. The link points to a Java Network Launch Protocol (JNLP) file that instructs the Java Web Start software to download, cache, and run the application.
Java Web Start software provides many deployment advantages for Java developers and users:
- With Java Web Start software, you can place a single Java application on a web server for deployment on a variety of platforms, including Windows, Linux, and Solaris.
- Java Web Start software supports multiple, simultaneously running Java platform versions. An application can request a specific version of the Java Runtime Environment (JRE) software without conflicting with the needs of other applications.
- Users can create desktop shortcuts to launch Java Web Start applications outside the browser.
- Java Web Start software leverages the inherent security of the Java platform. By default, applications have restricted access to local disk and network resources.
- Applications launched with Java Web Start software are cached locally for improved performance.
- Updates for Java Web Start applications are automatically downloaded when the user runs the application independently from the desktop.
Java Web Start software is installed as part of the JRE software. Users do not need to install Java Web Start software separately or perform any other tasks to use Java Web Start applications.
Additional References
This lesson is intended to get you started with Java Web Start technology and does not include all available documentation. For more information on Java Web Start technology, see the following:
- Java Web Start Guide
- Java Web Start FAQ
- JNLP Specification
javax.jnlpAPI Documentation- Java Web Start Developer Site
Developing a Java Web Start Application
Software designed with a component-based architecture can be easily developed and deployed as a Java Web Start application. Consider the example of a Java Web Start application with a Swing-based graphical user interface (GUI). With component-based design, the GUI can be built using smaller building blocks or components. Here are the general steps to create the application GUI:
- Create a
MyTopJPanelclass that is a subclass ofJPanel. In the constructor of theMyTopJPanelclass, layout the GUI components of the application. - Create a class called
MyApplicationthat is a subclass ofJFrame. - In the
mainmethod of theMyApplicationclass, instantiate theMyTopJPanelclass and set it as the content pane of theJFrame.
The following sections explore these steps in more detail using the Dynamic Tree Demo application. If you are unfamiliar with Swing, see Creating a GUI With Swing to learn more about using Swing GUI components.
Click the following launch button to start the Dynamic Tree Demo application.
<script>
    var url = "https://docs.oracle.com/javase/tutorialJWS/samples/deployment/dynamictree_webstartJWSProject/dynamictree_webstart.jnlp";
    deployJava.createWebStartLaunchButton(url, '1.7.0');
</script>
Note: If you cannot see the example running, ensure that the JavaScript interpreter is enabled in your browser so that the deployment toolkit script can run correctly.
Creating the Top-Level JPanel Class
Create a subclass of JPanel. This top-level JPanel serves as a container for all other UI components. In the following example, the DynamicTreePanel class is the top-level JPanel. The constructor of the DynamicTreePanel class calls other methods to properly create and layout the UI controls.
public class DynamicTreePanel extends JPanel implements ActionListener {
    private int newNodeSuffix = 1;
    private static String ADD_COMMAND = "add";
    private static String REMOVE_COMMAND = "remove";
    private static String CLEAR_COMMAND = "clear";

    private DynamicTree treePanel;

    public DynamicTreePanel() {
        super(new BorderLayout());

        //Create the components.
        treePanel = new DynamicTree();
        populateTree(treePanel);

        JButton addButton = new JButton("Add");
        addButton.setActionCommand(ADD_COMMAND);
        addButton.addActionListener(this);

        JButton removeButton = new JButton("Remove");
        // ...

        JButton clearButton = new JButton("Clear");
        // ...

        //Lay everything out.
        treePanel.setPreferredSize(new Dimension(300, 150));
        add(treePanel, BorderLayout.CENTER);

        JPanel panel = new JPanel(new GridLayout(0,3));
        panel.add(addButton);
        panel.add(removeButton);
        panel.add(clearButton);
        add(panel, BorderLayout.SOUTH);
    }
    // ...
}
Creating the Application
For an application with a Swing-based GUI, create a class that is a subclass of javax.swing.JFrame.
In the application's main method, instantiate your top-level JPanel class and set it as the content pane of the JFrame. The main method of the DynamicTreeApplication class calls the createGUI method on the AWT event dispatching thread.
package webstartComponentArch;

import javax.swing.JFrame;

public class DynamicTreeApplication extends JFrame {
    public static void main(String [] args) {
        DynamicTreeApplication app = new DynamicTreeApplication();
        app.createGUI();
    }

    private void createGUI() {
        //Create and set up the content pane.
        DynamicTreePanel newContentPane = new DynamicTreePanel();
        newContentPane.setOpaque(true);
        setContentPane(newContentPane);
        setDefaultCloseOperation(JFrame.EXIT_ON_CLOSE);
        pack();
        setVisible(true);
    }
}
Benefits of Separating Core Functionality from the Final Deployment Mechanism
An alternative approach to creating the application is to remove the abstraction layer (separate top-level JPanel) and layout all controls directly in the application's main method. The disadvantage of creating the GUI directly in the application's main method is that if you later choose to deploy the functionality as an applet, deployment will be more difficult.
In the Dynamic Tree Demo example, the core functionality is separated into the DynamicTreePanel class. Now, it becomes very easy to put the DynamicTreePanel class into a JApplet and deploy it as an applet.
Therefore, to maintain portability and keep deployment options open, follow the component-based design approach described in this topic.
Download the source code for further experimentation with the Dynamic Tree Demo example.
Retrieving Resources
Use the getResource method to read resources from JAR files. For example, the following code retrieves images from a JAR file.
// Get current classloader
ClassLoader cl = this.getClass().getClassLoader();
// Create icons
Icon saveIcon  = new ImageIcon(cl.getResource("images/save.gif"));
Icon cutIcon   = new ImageIcon(cl.getResource("images/cut.gif"));
The example assumes that the following entries exist in the application's JAR file:
- images/save.gif
- images/cut.gif
Deploying a Java Web Start Application
To deploy your Java Web Start application, first compile the source code, package it into a JAR file, and sign the JAR file.
Java Web Start applications are launched using the Java Network Launch Protocol (JNLP). Therefore, you must create a JNLP file to deploy your application.
The deployment toolkit script contains useful JavaScript functions that can be used to deploy Java Web Start applications on a web page.
If you are not familiar with these deployment technologies, review the In-Depth Deployment lesson before continuing.
Here are some step-by-step instructions for packaging and deploying your application. The Dynamic Tree Demo application is used to illustrate the deployment of Java Web Start applications. You may want to set up build scripts to perform some of these steps.
Click the following launch button to start the Dynamic Tree Demo application.
<script>
    var url = "https://docs.oracle.com/javase/tutorialJWS/samples/deployment/dynamictree_webstartJWSProject/dynamictree_webstart.jnlp";
    deployJava.createWebStartLaunchButton(url, '1.7.0');
</script>
Note: If you cannot see the example running, ensure that the JavaScript interpreter is enabled in your browser so that the deployment toolkit script can run correctly.
-
Compile your application's Java code and ensure all class files and resources (such as images) are in a separate directory.
In the Dynamic Tree Demo application, the compiled class files are placed in the
build/classes/webstartComponentArchdirectory. -
Create a text file that contains any JAR file manifest properties required for your applet.
For the Dynamic Tree Demo applet, create a file named
mymanifest.txtin thebuild/classesdirectory and add thePermissions,Codebase, andApplication-Nameproperties. The applet does not need access to user system resources, so usesandboxfor permissions. For the codebase, use the domain that will load the example, such asmyserver.com. Add the following properties to themymanifest.txtfile:
Permissions: sandbox
Codebase: myserver.com
Application-Name: Dynamic Tree Demo
Other manifest properties can be used to restrict the applet to only use trusted code and provide security for applets that need to make calls between privileged and sandbox Java code, or have JavaScript code that calls the applet. See the Enhancing Security with Manifest Attributes lesson for more available manifest properties.
-
Create a JAR file that contains the application class files and resources. Include the manifest properties from the
mymanifest.txtfile created in the previous step.For example, the following command will create a JAR file from the class files in the
build/classes/webstartComponentArchdirectory and the manifest file in thebuild/classesdirectory.
% cd build/classes
% jar cvfm  DynamicTreeDemo.jar  mymanifest.txt webstartComponentArch
See the Packaging Programs in JAR Files lesson for more information on creating and using JAR files.
-
Sign the JAR file for your applet and timestamp the signature. Use a valid, current code-signing certificate issued by a trusted certificate authority to provide your users with assurance that the applet can be safely run.
For more information, see the Signing JAR Files lesson.
If you want to use signed JNLP files for security, create the JNLP file as described in the next step and include it in the JAR file before signing the JAR file. For more information, see Signed JNLP Files in the Java Platform Standard Edition Deployment Guide.
-
Create a JNLP file that describes how the application is launched.
Here is the JNLP file used to launch the Dynamic Tree Demo application. For this application, no permissions are requested, so it runs in the security sandbox. The source code for
dynamictree_webstart.jnlpis as follows:
<?xml version="1.0" encoding="UTF-8"?>
<jnlp spec="1.0+" codebase="https://docs.oracle.com/javase/tutorialJWS/samples/deployment/webstart_ComponentArch_DynamicTreeDemo"
    href="dynamictree_webstart.jnlp">
    <information>
        <title>Dynamic Tree Demo</title>
        <vendor>Dynamic Team</vendor>
    </information>
    <resources>
        <!-- Application Resources -->
        <j2se version="1.7+" href="http://java.sun.com/products/autodl/j2se"/>
        <jar href="DynamicTreeDemo.jar" main="true" />
    </resources>
    <application-desc
         name="Dynamic Tree Demo Application"
         main-class="webstartComponentArch.DynamicTreeApplication"
         width="300"
         height="300">
     </application-desc>
     <update check="background"/>
</jnlp>
The structure of the JNLP file describes the syntax and options of the JNLP file.
Note: The codebase and href attributes are optional when deploying Java Web Start applications that will run on Java SE 6 update 18 or later. When deploying Java Web Start applications that will run on earlier versions of the Java Runtime Environment software, you must specify the codebase and href attributes.
-
Create an HTML page from which to launch your application. Call the deployment toolkit function to deploy the Java Web Start application.
In the example, the Dynamic Tree Demo application is deployed in
JavaWebStartAppPage.html.
<body>
    <!-- ... -->
    <script src="https://www.java.com/js/deployJava.js"></script>
    <script>
        // using JavaScript to get location of JNLP
        // file relative to HTML page
        var dir = location.href.substring(0,
            location.href.lastIndexOf('/')+1);
        var url = dir + "dynamictree_webstart.jnlp";
        deployJava.createWebStartLaunchButton(url, '1.7.0');
    </script>
    <!-- ... -->
</body>
If you are unsure whether the JavaScript interpreter is enabled in the end user's browser, you can deploy a Java Web Start application by directly creating a link to the JNLP file, as shown below:
<a href="/absolute path to JNLP file/dynamictree_webstart.jnlp">Launch Notepad Application</a>
If you deploy a Java Web Start application via a direct link, you cannot take advantage of the additional checks provided by the deployment toolkit functions. For more information, see the In-Depth Deployment lesson on Deploying a Java Web Start Application.
-
Place the application's JAR file, JNLP file, and HTML page in the apropriate folders.
For this example, place
DynamicTreeDemo.jar,dynamictree_webstart.jnlp, andJavaWebStartAppPage.htmlin the same directory on your local computer or web server. It is best to use a web server. To run from a local computer, you must add the application to the exception site list, which can be managed from the Security tab of the Java Control Panel. -
Open the application's HTML page in a browser to view the application. Agree to run the application when prompted. Check the Java console log for errors and debug messages.
Download the source code for further experimentation with the Dynamic Tree Demo example.
Setting Up a Web Server
You may need to configure your web server to handle Java Network Launch Protocol (JNLP) files. If the web server is not set up correctly, Java Web Start applications will not launch when you click the link to the JNLP file.
Configure your web server so that files with the .jnlp extension are set to the application/x-java-jnlp-file MIME type.
The specific steps for setting the JNLP MIME type will vary depending on the web server. For example, to configure the Apache web server, you should add the following line to the mime.types file.
application/x-java-jnlp-file JNLP
For other web servers, consult the documentation for instructions on setting MIME types.
Running a Java Web Start Application
Users can run Java Web Start applications in the following ways:
- Running a Java Web Start application from a browser
- Running a Java Web Start application from the Java Cache Viewer
- Running a Java Web Start application from the desktop
Note: To run applications deployed with Java Web Start technology, you must have a compatible version of the Java Runtime Environment (JRE) software. A full Java Development Kit (JDK) is not required.
Running a Java Web Start Application from a Browser
You can run a Java Web Start application from a browser by clicking a link to the application's JNLP file. The following text is an example of a link to a JNLP file.
<a href="/some/path/Notepad.jnlp">Launch Notepad Application</a>
The Java Web Start software loads and runs the application based on the instructions in the JNLP file.
Try it now: Run Notepad
Running a Java Web Start Application from the Java Cache Viewer
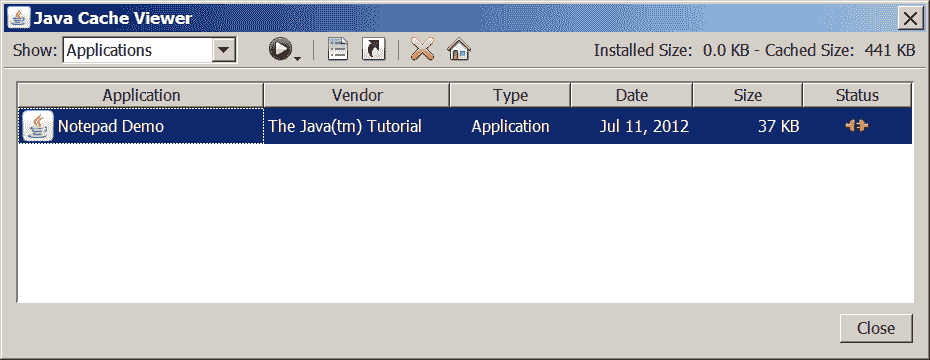
If you are using at least Java Platform Standard Edition 6 or later, you can run Java Web Start applications from the Java Cache Viewer.
When the Java Web Start software first loads an application, the information in the application's JNLP file is stored in the local Java Cache Viewer. To start the application again, you do not need to return to the web page where you first launched it; you can launch it from the Java Cache Viewer.
To open the Java Cache Viewer:
- Open the Control Panel.
- Double-click the Java icon. The Java Control Panel will open.
- Select the "General" tab.
- Click "View". The Java Cache Viewer will open.
Applications will be listed on the Java Cache Viewer screen.
 Java Cache Viewer application
To run an application, select it and click the "Run" button,  , or double-click the application. The application will start as if launched from a web page.
Running a Java Web Start Application from the Desktop
You can add a desktop shortcut for Java Web Start applications. Select the application in the Java Cache Viewer. Right-click and select "Install Shortcut" or click the "Install" button,  .
.
A shortcut is added to the desktop.

Then, you can launch the Java Web Start application just like any local application.
Java Web Start and Security
This section describes the security basics for applications deployed via Java Web Start, including:
Applications launched with Java Web Start run in a restricted environment called the sandbox by default. In this sandbox, Java Web Start:
- Protects users from malicious code that could affect local files
- Protects enterprises from code that could attempt to access or corrupt network data
Sandbox applications launched via Java Web Start remain in this sandbox, meaning they cannot access the local file system or network. For more information, see Security in Rich Internet Applications.
Dynamically Downloading HTTPS Certificates
Java Web Start dynamically imports certificates, as browsers typically do. To do this, Java Web Start sets its own https handler, using the java.protocol.handler.pkgs system property to initialize the default SSLSocketFactory and HostnameVerifier. It sets the defaults using the methods HttpsURLConnection.setDefaultSSLSocketFactory and HttpsURLConnection.setDefaultHostnameVerifier.
If your application uses these two methods, ensure they are called after Java Web Start initializes the https handler; otherwise, your custom handler will be replaced by the Java Web Start default handler.
You can ensure that your custom SSLSocketFactory and HostnameVerifier are used by doing one of the following:
- Install your own
httpshandler to replace the Java Web Starthttpshandler. - In your application, call
HttpsURLConnection.setDefaultSSLSocketFactoryorHttpsURLConnection.setDefaultHostnameVerifieronly after creating the firsthttps URLobject, which will first execute the Java Web Starthttpshandler initialization code.
Common Java Web Start Problems
This section covers some common problems you might encounter when developing and deploying Java Web Start applications. Each problem is followed by possible causes and solutions.
Problem: My browser displays my application's Java Network Launch Protocol (JNLP) file as plain text.
Most likely, your web server does not know the correct MIME type for JNLP files. For more information, see the Setting Up a Web Server section.
Additionally, if you are using a proxy server, ensure that file timestamps are updated so that the proxy server will update its cache if resources are updated on the web server.
Problem: When I try to launch my JNLP file, I receive the following error:
MissingFieldException[ The following required field is missing from the launch
  file: (<application-desc>|<applet-desc>|<installer-desc>|<component-desc>)]
        at com.sun.javaws.jnl.XMLFormat.parse(Unknown Source)
        at com.sun.javaws.jnl.LaunchDescFactory.buildDescriptor(Unknown Source)
        at com.sun.javaws.jnl.LaunchDescFactory.buildDescriptor(Unknown Source)
        at com.sun.javaws.jnl.LaunchDescFactory.buildDescriptor(Unknown Source)
        at com.sun.javaws.Main.launchApp(Unknown Source)
        at com.sun.javaws.Main.continueInSecureThread(Unknown Source)
        at com.sun.javaws.Main.run(Unknown Source)
        at java.lang.Thread.run(Unknown Source)
This error usually occurs when your XML is not well-formed. You can stare at the code until you find the problem, but an easier way is to run an XML syntax checker on the file. (NetBeans IDE and jEdit both provide XML syntax checkers.)
However, this error can occur in other situations; the above was caused by another case, and in this case, it was caused by the following line in an otherwise well-formed XML file:
<description kind="short">Demonstrates choosing the drop location in the target <code>TransferHandler</code></description>
The error was caused by the illegal embedded code tag.
Questions and Exercises: Java Web Start
Questions
- In the link to run a Java Web Start application, which file is specified as the
hrefattribute of theatag? - Which MIME type must a web server recognize to host Java Web Start applications?
- In the application's
JNLPfile, which two elements must be specified within theresourceselement? - Which interface provides the ability to control how resources for a Java Web Start application are cached?
BasicServiceDownloadServicePersistenceServiceExtendedService
- True or False: Java Web Start applications run in the security sandbox by default.
- True or False: If a Java Web Start application runs in the security sandbox, the application's JAR file can be located on a different server.
- What must you do for a Java Web Start application to support operations outside the security sandbox?
Exercises
- Write the XML code that you would add to the
JNLPfile to request that the application have full access to the client system. - For a Java Web Start application, there are two icons in the
imagesdirectory of the JAR file:one.gifandtwo.gif. Write the application code that you would use to access these images.
Check your answers.
Lesson: Doing More with Java Rich Internet Applications
Applets launched using the Java Network Launch Protocol (JNLP) have functionality similar to Java Web Start applications. This lesson covers common topics in developing and deploying applets and Java Web Start applications (collectively referred to as rich internet applications). If you are new to applets or Java Web Start applications, you can learn more in the following lessons of the Java Tutorials:
- To learn more about applet development and deployment, visit the Java Applets lesson.
- To learn more about developing and deploying Java Web Start applications, visit the Java Web Start lesson.
Note: Ensure that you have at least Java SE Development Kit (JDK) 6 update 10 installed on your client machine before continuing. You will need this version to view the example rich internet applications and read the subsequent sections without interruption.
Setting Trusted Parameters and Security Properties
You can set specific Java Virtual Machine parameters and security properties in the Java Network Launch Protocol (JNLP) file of a rich internet application (RIA). For applets, you can also set parameters in the java_arguments parameter of the <applet> tag. While there is a set of predefined security properties, you can also define new security properties by prefixing the property name with "jnlp." or "javaws.". Properties can be retrieved in your RIA using the System.getProperty method.
Consider the Properties and Arguments Demo Applet. The following Java Virtual Machine parameters and properties are set in the applet's JNLP file appletpropsargs.jnlp.
-Xmx– a secure parameter, set to "256M"sun.java2d.noddraw– a predefined secure property, set to "true"jnlp.myProperty– a user-defined secure property, set to "a user-defined property"
<?xml version="1.0" encoding="UTF-8"?>
<jnlp spec="1.0+" codebase="" href="">
    <information>
        <title>Properties and Arguments Demo Applet</title>
        <vendor>Dynamic Team</vendor>
    </information>
    <resources>
        <!-- Application Resources -->
        <j2se version="1.6+" href="http://java.sun.com/products/autodl/j2se"
              <!-- secure java vm argument -->
              java-vm-args="-Xmx256M"/>
        <jar href="applet_PropertiesAndVMArgs.jar" main="true" />
            <!-- secure properties -->
        <property name="sun.java2d.noddraw" value="true"/>
        <property name="jnlp.myProperty" value="a user-defined property"/>
    </resources>
    <applet-desc
         name="Properties and Arguments Demo Applet"
         main-class="PropertiesArgsDemoApplet"
         width="800"
         height="50">
     </applet-desc>
     <update check="background"/>
</jnlp>
The PropertiesArgsDemoApplet class uses the System.getProperty method to retrieve the java.version property and other properties set in the JNLP file. The PropertiesArgsDemoApplet class also displays these properties.
import javax.swing.JApplet;
import javax.swing.SwingUtilities;
import javax.swing.JLabel;

public class PropertiesArgsDemoApplet extends JApplet {
    public void init() {
        final String javaVersion = System.getProperty("java.version");
        final String swing2dNoDrawProperty = System.getProperty("sun.java2d.noddraw");
        final String jnlpMyProperty = System.getProperty("jnlp.myProperty");

        try {
            SwingUtilities.invokeAndWait(new Runnable() {
                public void run() {
                    createGUI(javaVersion, swing2dNoDrawProperty, jnlpMyProperty);
                }
            });
        } catch (Exception e) {
            System.err.println("createGUI didn't successfully complete");
        }
    }
    private void createGUI(String javaVersion, String swing2dNoDrawProperty, String jnlpMyProperty) {
        String text = "Properties: java.version = " + javaVersion +
                ",  sun.java2d.noddraw = " + swing2dNoDrawProperty +
                ",   jnlp.myProperty = " + jnlpMyProperty;
        JLabel lbl = new JLabel(text);
        add(lbl);
    }
}
The Properties and Arguments Demo Applet is shown next. You can also see the applet running in AppletPage.html.
<script>
    var attributes = { code:'PropertiesArgsDemoApplet.class',
        archive:'examples/dist/applet_PropertiesAndVMArgs/applet_PropertiesAndVMArgs.jar',
        width:800, height:50} ;
    var parameters = { jnlp_href: 'examples/dist/applet_PropertiesAndVMArgs/appletpropsargs.jnlp' };
    deployJava.runApplet(attributes, parameters, '1.6');
</script>
Note: If you cannot see the applet running, you need to install at least Java SE Development Kit (JDK) 6 update 10.
Note: If you cannot see the example running, ensure that the JavaScript interpreter is enabled in your browser so that the deployment toolkit script can run correctly.
Download the source code for further experimentation with the Properties and Arguments Demo Applet example.
See System Properties for the complete set of system properties that can be accessed by RIAs.
System Properties
This topic lists the system properties that can be accessed by rich internet applications (RIAs) that are restricted to the security sandbox and launched with or without the Java Network Launch Protocol (JNLP). Some system properties cannot be accessed by sandboxed rich internet applications.
All rich internet applications can retrieve the following secure system properties:
All RIAs can retrieve the following secure system properties:
java.class.versionjava.vendorjava.vendor.urljava.versionos.nameos.archos.versionfile.separatorpath.separatorline.separator
Secure system properties that can be accessed by RIAs launched with JNLP
RIAs launched with JNLP can set and retrieve the following secure properties:
awt.useSystemAAFontSettingshttp.agenthttp.keepAlivejava.awt.syncLWRequestsjava.awt.Window.locationByPlatformjavaws.cfg.jauthenticatorjavax.swing.defaultlfsun.awt.noerasebackgroundsun.awt.erasebackgroundonresizesun.java2d.d3dsun.java2d.dpiawaresun.java2d.noddrawsun.java2d.openglswing.boldMetalswing.metalThemeswing.noxpswing.useSystemFontSettings
System properties that are prohibited from access
Sandboxed rich internet applications cannot access the following system properties:
java.class.pathjava.homeuser.diruser.homeuser.name
JNLP API
Rich internet applications (RIAs) can use the Java Network Launch Protocol (JNLP) API to perform a wide range of operations on the user environment. When launched with JNLP, even unsigned RIAs can perform the following operations with user permission:
- They can access the user's file system using the
FileOpenServiceandFileSaveServiceAPIs. - They can access the shared system clipboard using the
ClipboardServiceAPI. - They can access printing functionality using the
PrintServiceAPI. - They can access persistent storage using the
PersistenceServiceAPI. - They can control how the RIA is downloaded and cached using the
DownloadServiceAPI. - They can determine the progress of the RIA download using the
DownloadServiceListenerAPI. - They can decide how to handle parameters when multiple instances of the RIA are launched using the
SingleInstanceServiceAPI. - They can request permission to open certain files that have not been opened before using the
ExtendedServiceAPI.
See the JNLP API documentation for a complete list of functionality available to RIAs launched with JNLP.
Accessing the Client Using the JNLP API
When launched with the Java Network Launch Protocol (JNLP), rich internet applications (RIAs) can access the client with user permission. Consider the Text Editor applet example to see how to use services based on the JNLP API. The text editor has a text area and buttons labeled Open, Save, and Save As. The text editor can be used to open an existing text file, edit it, and save it back to disk.
The Text Editor applet is shown next.
<script>
    var attributes = { code:'TextEditorApplet.class',
        archive:'examples/dist/applet_JNLP_API/applet_JNLP_API.jar',
        width:500, height:300} ;
    var parameters = { jnlp_href: 'examples/dist/applet_JNLP_API/texteditor_applet.jnlp' };
    deployJava.runApplet(attributes, parameters, '1.6');
</script>
Note: If you cannot see the applet running, install at least Java SE Development Kit (JDK) 6 update 10.
Note: If you cannot see the example running, you may need to enable the JavaScript interpreter in your browser so that the deployment toolkit script can run correctly.
The TextEditor and TextEditorApplet classes layout the user interface and display it as an applet. The FileHandler class contains the core functionality regarding the use of JNLP API-based services.
Remember, the techniques described in this topic also apply to Java Web Start applications.
To use a JNLP service, first obtain a reference to the service. The initialize method of the FileHandler class retrieves references to JNLP services, as shown in the following code snippet:
private static synchronized void initialize() {
    ...
    try {
        fos = (FileOpenService)
            ServiceManager.lookup("javax.jnlp.FileOpenService");
        fss = (FileSaveService)
            ServiceManager.lookup("javax.jnlp.FileSaveService");
    } catch (UnavailableServiceException e) {
        ...
    }
}
After obtaining references to the required services, call methods on the services to perform the necessary operations. The open method of the FileHandler class calls the openFileDialog method of the FileOpenService class to display a file chooser. The open method returns the contents of the selected file.
public static String open() {
    initialize();
    try {
        fc = fos.openFileDialog(null, null);
        return readFromFile(fc);
    } catch (IOException ioe) {
        ioe.printStackTrace(System.out);
        return null;
    }
}
Similarly, the save and saveAs methods of the FileHandler class call the corresponding methods of the FileSaveService class to enable the user to choose a file name and save the contents of the text area to disk.
public static void saveAs(String txt) {
    initialize();
    try {
        if (fc == null) {
            // If not already saved.
            // Save-as is like save
            save(txt);
        } else {
            fc = fss.saveAsFileDialog(null, null,
                                         fc);
            save(txt);
        }
    } catch (IOException ioe) {
        ioe.printStackTrace(System.out);
    }
}
At runtime, when the RIA tries to open or save a file, the user sees a security dialog asking them whether to allow the operation. The operation proceeds only if the user allows the RIA to access their environment.
The full source code of the FileHandler class is shown below.
// add javaws.jar to the classpath during compilation
import javax.jnlp.FileOpenService;
import javax.jnlp.FileSaveService;
import javax.jnlp.FileContents;
import javax.jnlp.ServiceManager;
import javax.jnlp.UnavailableServiceException;
import java.io.*;

public class FileHandler {

    static private FileOpenService fos = null;
    static private FileSaveService fss = null;
    static private FileContents fc = null;

    // retrieves a reference to the JNLP services
    private static synchronized void initialize() {
        if (fss != null) {
            return;
        }
        try {
            fos = (FileOpenService) ServiceManager.lookup("javax.jnlp.FileOpenService");
            fss = (FileSaveService) ServiceManager.lookup("javax.jnlp.FileSaveService");
        } catch (UnavailableServiceException e) {
            fos = null;
            fss = null;
        }
    }

    // displays open file dialog and reads selected file using FileOpenService
    public static String open() {
        initialize();
        try {
            fc = fos.openFileDialog(null, null);
            return readFromFile(fc);
        } catch (IOException ioe) {
            ioe.printStackTrace(System.out);
            return null;
        }
    }

    // displays saveFileDialog and saves file using FileSaveService
    public static void save(String txt) {
        initialize();
        try {
            // Show save dialog if no name is already given
            if (fc == null) {
                fc = fss.saveFileDialog(null, null,
                        new ByteArrayInputStream(txt.getBytes()), null);
                // file saved, done
                return;
            }
            // use this only when filename is known
            if (fc != null) {
                writeToFile(txt, fc);
            }
        } catch (IOException ioe) {
            ioe.printStackTrace(System.out);
        }
    }

    // displays saveAsFileDialog and saves file using FileSaveService
    public static void saveAs(String txt) {
        initialize();
        try {
            if (fc == null) {
                // If not already saved. Save-as is like save
                save(txt);
            } else {
                fc = fss.saveAsFileDialog(null, null, fc);
                save(txt);
            }
        } catch (IOException ioe) {
            ioe.printStackTrace(System.out);
        }
    }

    private static void writeToFile(String txt, FileContents fc) throws IOException {
        int sizeNeeded = txt.length() * 2;
        if (sizeNeeded > fc.getMaxLength()) {
            fc.setMaxLength(sizeNeeded);
        }
        BufferedWriter os = new BufferedWriter(new OutputStreamWriter(fc.getOutputStream(true)));
        os.write(txt);
        os.close();
    }

    private static String readFromFile(FileContents fc) throws IOException {
        if (fc == null) {
            return null;
        }
        BufferedReader br = new BufferedReader(new InputStreamReader(fc.getInputStream()));
        StringBuffer sb = new StringBuffer((int) fc.getLength());
        String line = br.readLine();
        while (line != null) {
            sb.append(line);
            sb.append("\n");
            line = br.readLine();
        }
        br.close();
        return sb.toString();
    }
}
Note: To compile Java code with references to classes in the javax.jnlp package, include <your JDK path>/jre/lib/javaws.jar in the classpath. At runtime, the Java Runtime Environment software automatically makes these classes available to the RIA.
Download the source code for further experimentation with the Text Editor Applet example.
Cookies
Web applications are typically a series of Hypertext Transfer Protocol (HTTP) requests and responses. Because HTTP is a stateless protocol, information is not automatically saved between HTTP requests. Web applications use cookies to store state information on the client. Cookies can be used to store information about the user, the user's shopping cart, and so on.
Types of Cookies
The two types of cookies are:
- Session cookie – A session cookie is stored in memory and is accessible as long as the user is using the web application. The session cookie is lost when the user exits the web application. These cookies are identified by a session ID and are most commonly used to store shopping cart details.
- Persistent cookie – A persistent cookie is used to store long-term information, such as user preferences and user identification information. Persistent cookies are stored in persistent storage and are not lost when the user exits the application. Persistent cookies are lost when they expire.
Cookie Support in Rich Internet Applications
Rich internet applications (applets and Java Web Start applications) support both session and persistent cookies. The underlying cookie storage depends on the client's browser and operating system.
To learn more about cookies, see the following:
- The Working with Cookies lesson in the Java Tutorials
- The API documentation for CookieManager and related classes
Accessing Cookies
You can set and retrieve cookies in rich internet applications (RIAs). Cookies can enhance the functionality of your RIA. For example, consider a scenario where you have applets on various web pages. An applet on one web page cannot directly access or share information from an applet on another web page. In this case, cookies provide an important connection between applets and help one applet pass information to an applet on a different web page. Java Web Start applications can also use cookies to store information on the client.
The Cookie Applet example has a CookieAccessor class for retrieving and setting cookies.
Retrieving Cookies
The following code snippet shows the getCookieUsingCookieHandler method of the CookieAccessor class:
public void getCookieUsingCookieHandler() {
    try {
        // Instantiate CookieManager;
        // make sure to set CookiePolicy
        CookieManager manager = new CookieManager();
        manager.setCookiePolicy(CookiePolicy.ACCEPT_ALL);
        CookieHandler.setDefault(manager);

        // get content from URLConnection;
        // cookies are set by web site
        URL url = new URL("http://host.example.com");
        URLConnection connection = url.openConnection();
        connection.getContent();

        // get cookies from underlying
        // CookieStore
        CookieStore cookieJar =  manager.getCookieStore();
        List <HttpCookie> cookies =
            cookieJar.getCookies();
        for (HttpCookie cookie: cookies) {
          System.out.println("CookieHandler retrieved cookie: " + cookie);
        }
    } catch(Exception e) {
        System.out.println("Unable to get cookie using CookieHandler");
        e.printStackTrace();
    }
}
The CookieManager class is the main entry point for managing cookies. Create an instance of the CookieManager class and set its CookiePolicy. Set this instance of the CookieManager class as the default CookieHandler.
Open a URLConnection to a website of your choice.
Next, retrieve cookies from the underlying CookieStore using the getCookies method.
Setting Cookies
The following code snippet shows the setCookieUsingCookieHandler method of the CookieAccessor class:
public void setCookieUsingCookieHandler() {
    try {
        // instantiate CookieManager
        CookieManager manager = new CookieManager();
        CookieHandler.setDefault(manager);
        CookieStore cookieJar =  manager.getCookieStore();

        // create cookie
        HttpCookie cookie = new HttpCookie("UserName", "John Doe");

        // add cookie to CookieStore for a
        // particular URL
        URL url = new URL("http://host.example.com");
        cookieJar.add(url.toURI(), cookie);
        System.out.println("Added cookie using cookie handler");
    } catch(Exception e) {
        System.out.println("Unable to set cookie using CookieHandler");
        e.printStackTrace();
    }
}
As shown in Retrieving Cookies, the CookieManager class is the main entry point for managing cookies. Create an instance of the CookieManager class and set that instance as the default CookieHandler.
Create an HttpCookie with the desired information. In our example, we create a new HttpCookie that sets UserName to John Doe.
Next, add the cookie to the underlying cookie store.
Running the Cookie Applet Example
To access cookies, you must sign your RIA JAR file and request permission to run outside the security sandbox. See the documentation for the jarsigner tool for information on how to sign JAR files. For information on requesting permissions, see Security in Rich Internet Applications.
Download the source code for further experimentation with the Cookie Applet example.
Security in Rich Internet Applications
The security model behind rich internet applications (RIAs) is designed to protect users from malicious internet applications. This topic discusses security aspects that apply to both applets and Java Web Start applications. For more information, see the following topics:
- What Applets Can and Cannot Do
- Java Web Start and Security
RIAs can be restricted to running in the Java security sandbox or can request permission to access resources outside the security sandbox. When a RIA is first launched, the user is prompted whether to allow running. The dialog that is displayed provides information about the signer's certificate and indicates whether the RIA requests permission to run outside the security sandbox. The user can then make an informed decision about whether to run the application.
Follow these guidelines to help secure your RIAs.
- Sign the RIA's JAR files with a certificate from a recognized certificate authority. For more information, see the Signing and Verifying JAR Files topic.
- If the RIA needs access to resources outside the security sandbox, specify the
all-permissionselement in the RIA's JNLP file. Otherwise, let the RIA run in the security sandbox by default. The following code snippet shows theall-permissionselement in the RIA's JNLP file.
<security>
   <all-permissions/>
</security>
If using the applet tag, see Deploying an Applet Using the Applet Tag for information on setting the permission level.
- A JNLP file can only contain JAR files signed by the same certificate. If you have JAR files signed with different certificates, specify them in separate JNLP files. In the RIA's main JNLP file, use the
component-descelement to include other JNLP files as component extensions. For more information, see The Structure of the JNLP File. - The security model for RIAs does not allow JavaScript code from a web page to call security-sensitive code in a signed JAR file unless you explicitly enable this functionality. In the signed JAR file, wrap the parts of the code that you want to be callable by JavaScript code in
AccessController.doPrivilegedblocks. This way, when the code in thedoPrivilegedblock executes, the JavaScript code can run with elevated privileges. - Try to avoid mixing privileged and sandbox components in a RIA, as they may raise security warnings about mixed code. For more information, see Mixing Privileged Code and Sandbox Code.
- Include the
PermissionsandCodebaseproperties in the JAR file manifest to ensure that your RIA requests only the permissions you specify and that the RIA is accessed from the correct location. See JAR File Manifest Properties for Security for more information. - JAR file manifest properties enable you to restrict access to your RIA and help ensure that your code is not tampered with. See Enhancing Security with Manifest Attributes for information on all available JAR file manifest properties.
Guidelines for Securing Rich Internet Applications
The following guidelines provide steps you can take to reduce the vulnerability of rich internet applications (RIAs) that you provide to users.
- Follow Secure Coding Guidelines
- Test with the Latest JRE Version
- Include Manifest Properties
- Use Signed JNLP Files
- Sign and Timestamp JAR Files
- Use the HTTPS Protocol
- Avoid Local RIAs
Follow Secure Coding Guidelines
Follow the recommendations in the Secure Coding Guidelines for the Java Programming Language. Section 4 "Accessibility and Extensibility" describes how to restrict access to classes and packages, thereby reducing the vulnerability of your code.
JavaScript code is considered untrusted and is restricted to the security sandbox by default. Minimize the interaction between your RIA and JavaScript code. Use AccessController.doPrivileged blocks cautiously, as they allow access from any HTML page or JavaScript code.
Test with the Latest JRE Version
Ensure that your RIA runs on the latest secure version of the JRE. The Java platform supports the ability for RIAs to specify which Java version is required to run the RIA; however, requiring users to maintain multiple JRE versions, especially old, insecure ones, is a security risk for users.
A benefit of RIAs is that updated versions of the RIA are automatically downloaded to the user's system. Test your RIA with each JRE update version to ensure it works correctly. If changes are needed, update your RIA on the server so that users can install the latest JRE and still run the RIA.
Include Manifest Properties
Add properties to the JAR file manifest that describe the RIA's characteristics. Compare them with values in the JNLP file or applet tag to verify that the correct code is running.
When your RIA does not require access beyond the security sandbox, request sandbox permissions. The Java sandbox provides additional protection for the user, and users may not run a privileged application if they do not understand why unlimited access to their system is needed.
Manifest properties can also be used to identify locations that can access your RIA. This includes locations from which JavaScript code can call your RIA, and locations from which the JNLP file or applet tag that launches your RIA can be used. For information on available manifest properties, see Enhancing Security with Manifest Attributes.
Use Signed JNLP Files
If your RIA needs access to non-secure system properties or JVM arguments, use a signed JNLP. If some variation between external and internal JNLP files is needed, use a JNLP template. See Signed JNLP Files for information.
To access non-secure system properties or JVM arguments, include the properties or arguments in the JNLP file as described in Setting Trusted Parameters and Security Properties.
Sign and Timestamp JAR Files
Obtain a code signing certificate from a trusted certificate authority and use it to sign your RIA's JAR files. Only deploy RIAs signed with a valid certificate to users.
When you sign JAR files, also timestamp the signature. Timestamping verifies that the certificate was valid at the time of signing the JAR, so the RIA is not automatically blocked when the certificate expires. See Signing JAR Files for information on signing and timestamping.
Self-signed and unsigned RIAs are considered unsafe and are not allowed to run unless the exception site list or deployment rule set is set to allow specific applications to run. However, self-signing can be useful for testing purposes. To test with your self-signed RIA, you can import the self-signed certificate into a trusted keystore.
Use the HTTPS Protocol
Use the HTTPS protocol for the web server from which users fetch your RIA. The HTTPS protocol is encrypted and verified by the server, making it harder for anyone to tamper with your RIA.
Avoid Local RIAs
Local RIAs are not intended for production use. To ensure that users run the code you intend them to run, host your RIA on an application server.
For testing, it is recommended to use a web server. Another option is to add your application to the exception site list, managed from the Security tab of the Java Control Panel.
Questions and Exercises: Doing More with Rich Internet Applications
Questions
- True or False: Rich internet applications (RIAs) can set secure properties by prefixing the property name with
"jnlp.". - True or False: Only signed rich internet applications (RIAs) can use the JNLP API to access files on the client.
Exercises
- In the following JNLP file, add a secure property named
jnlp.foowith the valuetrue.
<?xml version="1.0" encoding="UTF-8"?>
<jnlp spec="1.0+" codebase="" href="">
    <information>
        <title>Dynamic Tree Demo</title>
        <vendor>Dynamic Team</vendor>
    </information>
    <resources>
        <!-- Application Resources -->
        <j2se version="1.6+" href="http://java.sun.com/products/autodl/j2se" />
        <jar href="DynamicTreeDemo.jar" main="true" />
    </resources>
    <applet-desc
       name="Dynamic Tree Demo Applet"
       main-class="components.DynamicTreeApplet"
       width="300"
       height="300">
     </applet-desc>
     <update check="background"/>
</jnlp>
Check your answers.
Lesson: In-Depth Deployment
Rich internet application (RIA) deployment involves various technologies and tools, such as the Java Network Launch Protocol (JNLP), Deployment Toolkit, pack200, jarsigner, and so on. This lesson explores how these technologies and tools help developers deploy RIAs (applets and Java Web Start applications).
The main components involved in RIA deployment are:
- The HTML page in which the RIA will be deployed
- The RIA's JNLP file
- The JAR file containing the RIA's class files and resources
These components are referenced in subsequent topics.
User Acceptance of RIAs
For security, before a RIA is launched for the first time, users are prompted whether to allow the RIA to run, even if the application is signed or does not require access beyond the security sandbox. The prompt includes the following information, depending on the RIA being run:
- The name of the RIA, or a notification that the application is unsigned.
- If the application is signed with a certificate from a trusted authority, information about the publisher is displayed. A warning is included if the certificate has expired. If the application is self-signed, the publisher is shown as UNKNOWN.
- A warning if the certificate is expired, revoked, or the revocation status cannot be checked.
- The location from which the application is accessed.
- The level of access required by the application. Limited access restricts the application to the security sandbox; unlimited access allows the application to access resources on the user's system.
- A warning about missing JAR file manifest properties if the suggested properties are not present.
- For unsigned or self-signed applications, the user must select a checkbox to accept the application.
- In some cases, there is an option to not show the prompt again.
For a description of the prompts, see What to Do When I See a Java Security Prompt?
If the user is running an outdated JRE version, they are also warned and given the opportunity to update to the latest version before running the application. The user can also choose to run the application with the JRE on their system, or block the application from running.
The security level setting in the Java Control Panel determines whether the user has the opportunity to run the RIA. The default is High, which prompts the user whether to allow running applications that are signed with a valid certificate and include the Permissions attribute in the manifest of the main JAR file. If the revocation status of the application cannot be checked, the user can also run the application with the user's permission.
Signing your RIA provides a degree of trust for users. When preparing your application for deployment, consider the following:
- The best user experience is provided by applications signed with a certificate from a recognized certificate authority.
- Self-signed and unsigned applications are not allowed to run unless an exception site list or deployment rule set has been created to explicitly allow the application to run.
- Signed applications can be privileged or sandbox applications. Privileged applications have unrestricted access to resources on the user's system. Sandbox applications are restricted to the Java security sandbox. Unsigned applications are restricted to the sandbox.
Deployment Toolkit
The Deployment Toolkit script is a set of JavaScript functions that help developers deploy rich internet applications (RIAs) consistently across various browser and operating system configurations. The Deployment Toolkit script evaluates the underlying browser and operating system and uses the correct HTML to deploy the RIA. This script can also ensure that the required version of the Java Runtime Environment (JRE) software is present on the client machine. The Deployment Toolkit script was introduced in the Java Platform Standard Edition 6 Update 10 release.
Deployment Toolkit Script Location
The Deployment Toolkit script is located at the following URLs:
**http:**//www.java.com/js/deployJava.js(see note).**https:**//www.java.com/js/deployJava.js– Use the Deployment Toolkit script from this secure location when deploying your applet on a secure page to avoid mixed content warnings when the page loads.
Note: The **http:**//www.java.com/js/deployJava.js URL is being phased out. Use the **https:**//www.java.com/js/deployJava.js URL to launch all applications.
The JavaScript code at this location has been minimized for fast loading. You can view a readable version of the JavaScript code with associated comment blocks at https://www.java.com/js/deployJava.txt.
Note: The client browser should have the JavaScript interpreter enabled for the Deployment Toolkit script to run correctly and deploy your RIA.
Deploying an Applet
You can deploy an applet by using the runApplet function of the Deployment Toolkit script. The runApplet function ensures that the minimum required version of the Java Runtime Environment (JRE) software is present on the client, and then runs the applet. The runApplet function generates an HTML <applet> tag with the provided information.
Note: Depending on the browser type, it may not be possible to view the HTML generated by the Deployment Toolkit script when trying to view the source code of the web page. To view the generated HTML, try saving the HTML page after it loads, or use a tool like Firebug (Mozilla Firefox add-on).
You can deploy an applet by specifying deployment options as attributes and parameters of the <applet> tag. You can also specify deployment options in a Java Network Launch Protocol (JNLP) file to take advantage of advanced features. For more information on this protocol, see the Java Network Launch Protocol topic.
Note:
If the client does not have the minimum version of the required JRE software, the Deployment Toolkit script redirects the browser to http://www.java.com to allow the user to download the latest JRE software. On some platforms, the user may be redirected before viewing the web page containing the applet.
The parameters of the runApplet function depend on whether JNLP is used. Applets deployed with JNLP can only run if the next-generation Java Plug-in software is present on the client machine (the next-generation Java Plug-in software was introduced in the Java Platform Standard Edition 6 Update 10 release).
The next section shows how to use the runApplet function in an HTML page that will display the applet. The following usage scenarios are described:
- Specifying deployment options as attribute and parameter name-value pairs
- Specifying deployment options in a JNLP file using the
jnlp_hrefparameter - Specifying both attribute and parameter name-value pairs and a JNLP file (enabling the applet to run on both legacy and next-generation Java Plug-in software)
Function signature: runApplet: function(attributes, parameters, minimumVersion)
Parameters:
attributes– Names and values of attributes of the generated<applet>tagparameters– Names and values of<param>tags in the generated<applet>tagminimumVersion– Minimum version of JRE software required to run this applet
Usage:
-
Specifying deployment options as attribute and parameter name-value pairs
Attributes and parameters passed as name-value pairs will be written into the attributes and nested
<param>tags of the generated<applet>tag. Applets deployed in this way can be run by the legacy Java Plug-in software.
<!-- launch the Java 2D applet on JRE version 1.6.0 or higher with one parameter (fontSize) -->
<script src="https://www.java.com/js/deployJava.js"></script>
<script>
    var attributes = {code:'java2d.Java2DemoApplet.class',
        archive:'Java2Demo.jar', width:710, height:540};
    var parameters = { fontSize:16, permissions:'sandbox' };
    var version = '1.6';
    deployJava.runApplet(attributes, parameters, version);
</script>
Open DeployUsingNameValuePairs.html in a browser to see the Java2D applet.
Note: If you cannot see the applet running, you need to install at least Java SE Development Kit (JDK) 7.
-
Specifying deployment options in a JNLP file using the
jnlp_hrefparameterAttributes and parameters passed as name-value pairs (in this case
jnlp_href) will be written into the attributes and nested<param>tags of the generated<applet>tag. Applets deployed in this way can only be run by the next-generation Java Plug-in software. It is best to specify the width and height of the applet as attributes, as shown below:
<script src="https://www.java.com/js/deployJava.js"></script>
<script>
    var attributes = { code:'java2d.Java2DemoApplet', width:710, height:540 };
    var parameters = { jnlp_href: 'java2d.jnlp' };
    deployJava.runApplet(attributes, parameters, '1.6');
</script>
Open DeployUsingJNLP.html in a browser to see the Java2D applet.
Note: If you cannot see the applet running, you need to install at least Java SE Development Kit (JDK) 6 update 10.
-
Specifying both attribute and parameter name-value pairs and a JNLP file
By deploying an applet with JNLP, it can only run on the next-generation Java Plug-in software in the end user's browser. If you want your applet to also run on the legacy Java Plug-in software, specify deployment options using both attribute and parameter name-value pairs and a JNLP file.
<script src="https://www.java.com/js/deployJava.js"></script>
<script>
    var attributes = {code:'java2d.Java2DemoApplet.class',
            archive:'Java2Demo.jar', width:710, height:540};
    var parameters = { fontSize:16, jnlp_href:'java2d.jnlp' };
    var version = '1.6' ;
    deployJava.runApplet(attributes, parameters, version);
</script>
If some deployment options have different values in the attribute name-value pairs and the JNLP file, the following guidelines may be helpful:
- Specify
widthandheightas attribute name-value pairs (not in the JNLP file). - Specify parameters such as
imageandboxbgcoloras parameter name-value pairs (not in the JNLP file). These parameters are needed early in the applet launch process. - Leave the
codebaseattribute blank or specify an absolute URL in the JNLP file. When thecodebaseattribute is blank, it defaults to the directory containing the JNLP file. - If the applet is launched using a JNLP file, the values of the
code,codebase, andarchiveattributes will be taken from the JNLP file. If these attributes are also specified as attribute name-value pairs, the attribute name-value pairs will be ignored.
Open DeployUsingNameValuePairsAndJNLP.html in a browser to see the Java2D applet.
Note: If you cannot see the applet running, you need to install at least Java SE Development Kit (JDK) 7.
Download the source code for further experimentation.
Embedding a JNLP File in an Applet Tag
When deploying an applet using the Java Network Launch Protocol (JNLP), the Java Plug-in software launches the applet after downloading the JNLP file from the network. Starting from the Java SE 7 release, you can reduce applet startup time by embedding the JNLP file in the web page, thus avoiding an additional network request when the applet is first loaded. This results in faster applet startup on the web browser.
When deploying an applet in a web page, you can embed a Base64-encoded JNLP file in the jnlp_embedded parameter. The attributes of the <jnlp> element should satisfy the following restrictions:
- The
hrefattribute should contain a relative path. - The
codebaseattribute should not be specified. This means that the codebase will be derived from the URL of the web page loading the applet.
The following steps describe how to embed a JNLP file in a web page to deploy an applet.
- Create a
JNLPfile for your applet. An example file is shown below.
<?xml version="1.0" encoding="UTF-8"?>
<!-- href attribute contains relative path;
     codebase attribute not specified -->
<jnlp href="dynamictree_applet.jnlp">
    <information>
        <title>Dynamic Tree Demo</title>
        <vendor>Dynamic Team</vendor>
    </information>
    <resources>
        <!-- Application Resources -->
        <j2se version="1.7+" />
        <jar href="dist/applet_ComponentArch_DynamicTreeDemo/DynamicTreeDemo.jar"
             main="true" />
    </resources>
    <applet-desc
         name="Dynamic Tree Demo Applet"
         main-class="appletComponentArch.DynamicTreeApplet"
         width="300"
         height="300">
     </applet-desc>
     <update check="background"/>
</jnlp>
-
Encode the contents of the JNLP file using the Base64 scheme. You can use any Base64 encoding tool to encode the JNLP file. See the tool's usage to create a string with Base64 encoding. Some examples of tools and websites that can be used are:
- UNIX commands –
base64,uuencode - Websites – Base64 Encoding and Decoding, Base64 Encoder
- UNIX commands –
-
When deploying the applet in a web page, specify the
jnlp_embeddedparameter and set its value to the Base64-encoded JNLP string. Ensure that only the actual Base64 bytes are included, without any encoding tool-specific headers or footers.
<script src="https://www.java.com/js/deployJava.js"></script>
<script>
    var attributes = {} ;
    <!-- Base64 encoded string truncated below for readability -->
    var parameters = {jnlp_href: 'dynamictree_applet.jnlp',
        jnlp_embedded: 'PCEtLSANCi8qDQogKiBDb ... bmxwPg=='
    } ;
    deployJava.runApplet(attributes, parameters, '1.6');
</script>
Some encoding tools may wrap the encoded string into several 76-column lines. To use such multi-line attribute values in JavaScript code, specify the attribute value as a concatenated set of strings. If the applet is deployed directly using the <applet> HTML tag, you can include the multi-line attribute value as-is.
Open AppletPage.html in a browser to see the Dynamic Tree Demo applet launched by embedding the JNLP file in the web page.
Note: If you cannot see the applet running, install at least Java SE Development Kit (JDK) 7.
Note: If you cannot see the example running, you may need to enable the JavaScript interpreter in your browser so that the deployment toolkit script can run correctly.
Download the source code for further experimentation with the Embedded JNLP example.
