Vue 3 Vuex Configuration and Usage Guide
1. Basic Usage
When setting up a project, you can choose to integrate Vuex or configure it manually. If selected during initialization, the system will automatically generate a store directory with default configurations. Otherwise, installation is required via the command line:
npm install vuex@next --save
After installation, you need to create the store structure manually.
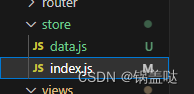
Below is a example of how to configure the store in store/index.js:
import { createStore } from 'vuex';

const mainStore = createStore({
  state() {
    return {
      counter: 0,
      testMessage: 'Sample Text'
    };
  },
  mutations: {
    addCount(state) {
      state.counter++;
    }
  },
  actions: {
    addCountAsync({ commit }) {
      setTimeout(() => {
        commit('addCount');
      }, 1000);
    }
  },
  getters: {
    doubledCounter: (state) => state.counter * 2
  }
});

export default mainStore;
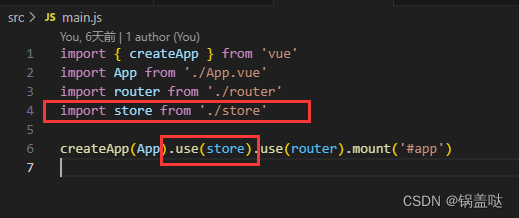
Once created, register the store in your main.js file.
Component Usage Example
The following snippet demonstrates how to interact with the store using Composition API:
<template>
  <div>
    <p>Current Counter Value: {{ counter }}</p>
    <p>Doubled Value: {{ doubledCounter }}</p>
    <button @click="syncAdd">Synchronous Add</button>
    <button @click="asyncAdd">Asynchronous Add</button>
  </div>
</template>

<script setup>
import { computed } from 'vue';
import { useStore } from 'vuex';

const store = useStore();

// Access State
const counter = computed(() => store.state.counter);

// Trigger Mutation
const syncAdd = () => {
  store.commit('addCount');
};

// Dispatch Action
const asyncAdd = () => {
  store.dispatch('addCountAsync');
};

// Access Getter
const doubledCounter = computed(() => store.getters.doubledCounter);
</script>
2. Handling Authentication: Vuex vs LocalStorage
A common scenario involves deciding whether to store authentication data locally or within the Vuex store. Combining both ensures that sensitive tokens persist across refreshes while maintaining reactive updates.
Using Vuex for Management
- Centralized Control: Provides a unified way to manage application state, such as user login status, across multiple components.
- Reactivity: Updates to Vuex state are automaticallly reflected in any component consuming them.
- Ephemeral Nature: By default, Vuex state does not persist. Refreshing the page clears the stored state.
Using LocalStorage for Persistence
- Data Retention:
localStorageallows saving data even after browser sessions end. - Security Considerations: Be cautious when storing sensitive information like tokens. Vulnerable to Cross-Site Scripting (XSS) attacks. Always use HTTPS.
3. Integrating Vuex with LocalStorage
To combine reactivity with persistence, follow this approach:
- Use Vuex for real-time state management inside the application.
- Use LocalStorage to save critical data like authentication tokens.
Example Implementation
When a user logs in successfully, save the token to local storage and update the store state:
// After successful login
localStorage.setItem('sessionToken', token);
store.commit('setToken', token);
In the Store configuration (index.js), initialize the state based on existing saved data:
import { createStore } from 'vuex';

const mainStore = createStore({
  state() {
    return {
      sessionToken: null
    };
  },
  mutations: {
    setToken(state, token) {
      state.sessionToken = token;
    }
  },
  actions: {
    async initializeState({ commit }) {
      const token = localStorage.getItem('sessionToken');
      if (token) {
        commit('setToken', token);
      }
    }
  }
});

mainStore.dispatch('initializeState');

export default mainStore;
You can also check for stored data directly upon app startup in main.js:
const token = localStorage.getItem('sessionToken');
if (token) {
  mainStore.commit('setToken', token);
}
This hybrid approach maintains responsive UI updates while ensuring user context survives page reloads.
4. Advanced: Persistent State Plugins
For more robust solutions, utilize third-party plugins like vuex-persistedstate. This simplifies the process of syncing Vuex state with local storage automatically.
Installation
npm install vuex-persistedstate
Module Structure
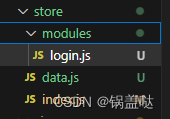
Create a folder named modules under store and define specific modules there (e.g., login.js).
Module Definition (store/modules/auth.js)
export const authModule = {
  namespaced: true,
  state: () => ({
    userInfo: {}
  }),
  mutations: {
    setUserProfile(state, profile) {
      state.userInfo = profile;
    }
  },
  actions: {
    fetchUserProfile({ commit }, profile) {
      // Simulating API call logic
      commit('setUserProfile', profile);
    }
  },
  getters: {
    getProfileInfo: (state) => state.userInfo
  }
};
Store Configuration (store/index.js)
import { createStore } from 'vuex';
import { authModule } from '@/store/modules/auth';
import createPersistedState from 'vuex-persistedstate';

const mainStore = createStore({
  modules: {
    authentication: authModule
  },
  plugins: [
    createPersistedState({
      paths: ['authentication']
    })
  ]
});

export default mainStore;
Component Integration
In your pages, access the persisted module:
import { computed } from 'vue';
import { useStore } from 'vuex';

const store = useStore();

// Update User Info
function updateUser(res) {
  store.commit('authentication/setUserProfile', res);
}

// Retrieve Data
const userInfo = computed(() => store.getters['authentication/getProfileInfo']);
console.log(userInfo.value);
