Implementing LVS Cluster with NAT Mode Using LVS, Apache, and NFS

Introduction
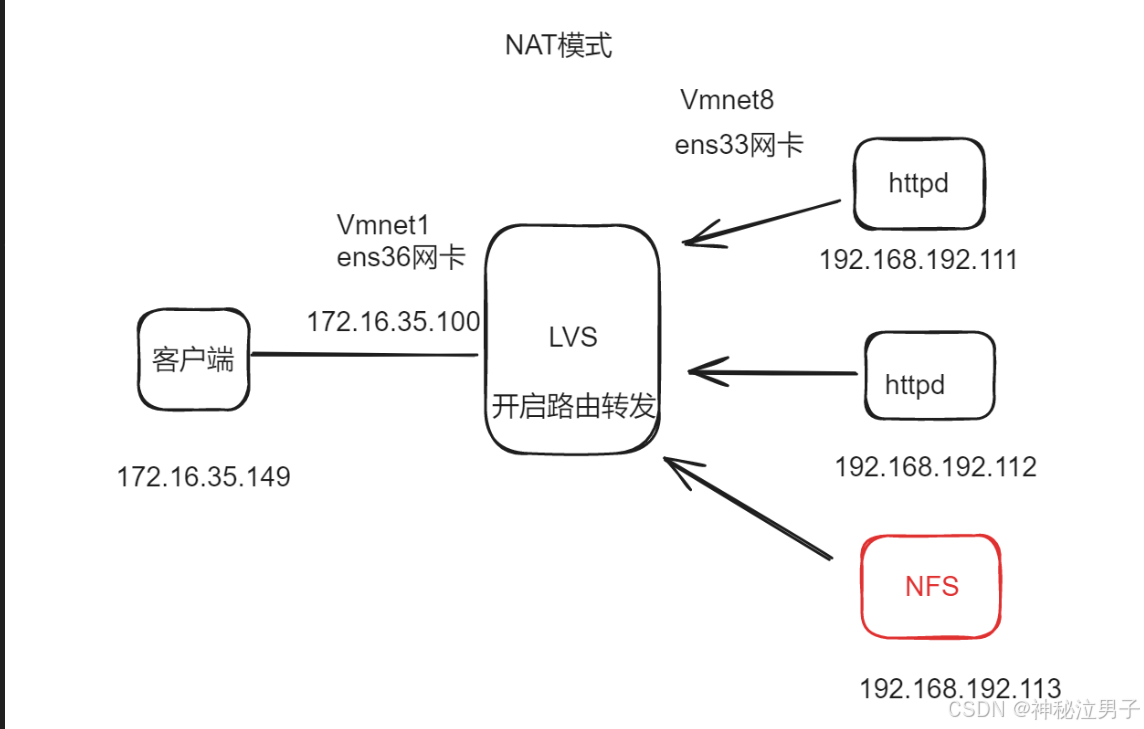
LVS (Linux Virtual Server) is a high-performance, highly available server clustering system that achieves load balancing for network services through IP load-balancing technology. NAT mode is one of the most commonly used working modes in LVS.
In NAT mode, an LVS cluster consists of three types of nodes:
- Load Balancer (Director Server): A server running LVS software that receives client requests and forwards them to real servers based on scheduling algorithms.
- Real Servers: A group of servers providing actual services, which can include web servers, database servers, etc.
- Shared Storage Server (NFS Server): To enable session sharing, real servers store session data on shared storage servers, typically implemented using NFS (Network File System).
The workflow of NAT mode is as follows:
- Clients send requests to the virtual IP (VIP) address of the load balancer.
- The load balancer selects a real server based on the scheduling algorithm and forwards request to that server via Network Address Translation (NAT).
- The real server processes the request and sends the response directly back to the client.
Configuring LVS in NAT mode involves the following steps:
- Install the LVS software package and kernnel modules.
- Configure the virtual IP (VIP) and pool of real servers (RIP) on the load balancer.
- Set up NAT rules and scheduling algorithms on the load balancer.
- Configure shared storage (NFS) on the real servers and mount it.
- Configure the gateway on real servers to point to the load balancer.
Experimental Environment
1. Load Balancer (LVS) Setup
# Navigate to network configuration directory
$ cd /etc/sysconfig/network-scripts/

# Copy interface configuration files
$ cp -p ifcfg-ens33 ifcfg-ens36

# Edit both interface configurations
$ vim ifcfg-ens33
$ vim ifcfg-ens36
Enable IP forwarding:
$ vim /etc/sysctl.conf

# Add or modify the line:
net.ipv4.ip_forward = 1

# Apply changes
$ sysctl -p
Restart network services and test connectivity:
$ systemctl restart network
Install required packages:
$ yum install -y ipvsadm
2. Web Server Configuration
Configure each web server's default gateway to point to the LVS server's ens33 interface IP address.
Install Apache HTTP Server on both web servers:
$ yum install -y httpd
3. Cluster Testing
To verify cluster functionality, manually create different index pages on each web server:
On first web server:
$ echo "Server One" > /var/www/html/index.html
On second web server:
$ echo "Server Two" > /var/www/html/index.html
Start/restart Apache service:
$ systemctl restart httpd
$ systemctl start httpd
Test acess from the LVS server to confirm basic connectivity before proceeding.
4. LVS Load Balancer Configuration
Load the IPVS kernel module and check current status:
$ modprobe ip_vs
$ cat /proc/net/ip_vs
Expected output:
IP Virtual Server version 1.2.1 (size=4096)
Prot LocalAddress:Port Scheduler Flags
  -> RemoteAddress:Port Forward Weight ActiveConn InActConn
Clear existing configurations and set up new ones:
$ ipvsadm -C

# Create virtual service with round-robin scheduler
$ ipvsadm -A -t 192.168.140.100:80 -s rr

# Add real servers using NAT mode (-m)
$ ipvsadm -a -t 192.168.140.100:80 -r 192.168.192.111:80 -m -w 1
$ ipvsadm -a -t 192.168.140.100:80 -r 192.168.192.112:80 -m -w 1

# Save configuration
$ ipvsadm-save > /etc/sysconfig/ipvsadm

# Start IPVS service
$ systemctl start ipvsadm
Set client gateway to 192.168.140.100 (ens36 interface). Perform access tests to observe load distribution between the two backend servers.
5. NFS Server Configuration
Install NFS utilities:
$ yum install -y rpcbind nfs-utils
Create shared directory and configure exports:
$ mkdir /wwwroot
$ vim /etc/exports

# Add export rule
/wwwroot 192.168.192.0/24(rw,sync,no_root_squash)
Start NFS services and verify:
$ systemctl start nfs rpcbind
$ netstat -nultp | grep rpcbind
$ showmount -e
Expected output:
Export list for localhost.localdomain:
/wwwroot 192.168.192.0/24
6. Mounting NFS Shares on Web Servers
Perform these operations on both web servers:
$ systemctl start nfs

# Check exported directories from NFS server
$ showmount -e 192.168.192.113

# Expected output:
# Export list for 192.168.192.113:
# /wwwroot 192.168.192.0/24

# Mount remote share locally
$ mount 192.168.192.113:/wwwroot /var/www/html

# Verify mount
$ df -hT
Test client access to verify successful deployment. You should see alternating responses indicating proper load balancing across the two web servers.
Check connection statistics:
$ ipvsadm -Ln
