Understanding ES6 Modules, Asynchronous Programming with Promises, and the Event Loop
Learning Objectives
- Understand how to use ES6 module syntax, including default and named exports/imports.
- Learn to use Promises to solve callback hell issues.
- Simplify Promise calls using async/await.
- Explain what the EventLoop is and how it processes asynchronous tasks.
- Describe the execution order of macro-tasks and micro-tasks.
Table of Contents
- ES6 Modules
- Promises
- async/await
- EventLoop
- Macro-tasks and Micro-tasks
1. ES6 Modules
1.1 Review: Module Implementation in Node.js
Node.js follows the CommonJS module specification:
- Use
require()to import modules. - Use
module.exportsto export members.
Benefits of modularization: Standardization reduces communication costs and facilitates module interaction.
1.2 Frontend Module Categories
Before ES6, the JavaScript community proposed standards like AMD, CMD, and CommonJS, but these had limitations:
- AMD and CMD were for browser-side JavaScript.
- CommonJS was for server-side JavaScript.
The variety of standards increased learning and development costs, leading to the unified ES6 module specification.
1.3 ES6 Module Specification
ES6 modules are universal for both browser and server environments, reducing the need to learn multiple standards. Key points:
- Each JS file is an independent module.
- Use
importto import members. - Use
exportto export members.
1.4 Using ES6 Modules in Node.js
Node.js defaults to CommonJS; to use ES6 modules:
- Ensure Node.js version 14.15.1 or higher is installed.
- Add
"type": "module"to the root ofpackage.json.
1.5 Basic ES6 Module Syntax
ES6 modules support three main usages:
- Default export and import.
- Named export and import.
- Direct import and execution of module code.
(1) Default Export and Import
- Default export syntax:
export default memberToExport - Default import syntax:
import alias from 'module-identifier'
Notes:
- Each module can have only one
export default. - The import alias can be any valid name.
Code example:
// moduleA.js
let privateVar = 10
let hiddenVar = 20
function privateFunc() {}

export default {
    privateVar,
    privateFunc
}

// moduleB.js
import importedModule from './moduleA.js'
console.log(importedModule) // Output: { privateVar: 10, privateFunc: [Function: privateFunc] }
(2) Named Export and Import
- Named export syntax:
export memberToExport - Named import syntax:
import { member } from 'module-identifier'
Notes:
- Multiple named exports per module are allowed.
- Import names must match export names.
- Use
asfor renaming during import. - Named imports can be combined with default imports.
Code example:
// moduleA.js
export let data1 = 'value1'
export let data2 = 'value2'
export function utility() {}

// moduleB.js
import { data1, utility } from './moduleA.js'
console.log(data1) // Output: value1
console.log(utility) // Output: [Function: utility]

import { data1 as renamedData } from './moduleA.js'
(3) Direct Import for Code Execution
If you only need to execute module code without importing members, use direct import.
Code example:
// moduleA.js
for (let i = 1; i < 3; i++) {
    console.log(i)
}
// No exports

// moduleB.js
import './moduleA.js' // Executes the code in moduleA
2. Promises
2.1 Callback Hell
Callback hell occurs with nested callbacks, leading to:
- Tight coupling and maintenance difficulties.
- Reduced code readability due to nesting.
Example:
setTimeout(() => {
    console.log('Output after 1 second')
    setTimeout(() => {
        console.log('Output after 2 more seconds')
        setTimeout(() => {
            console.log('Output after 3 more seconds')
        }, 3000)
    }, 2000)
}, 1000)
2.2 Using Promises to Solve Callback Hell
Promises, introduced in ES6, provide a better way to handle asynchronous operations.
2.2.1 Basic Concepts of Promises
- A Promise is a constructor:
const promiseInstance = new Promise(). - The
.then()method is onPromise.prototypeand is used to specify success and failure callbacks:promiseInstance.then(successCallback, failureCallback). - Success callback is required; failure callback is optional.
2.2.2 Example: Solving Callback Hell with .then()
Use a third-party package like then-fs for Promise-based file reading in Node.js.
Code example:
import thenFs from 'then-fs'

thenFs.readFile('./files/file1.txt', 'utf8')
    .catch((error) => {
        console.log(error.message)
    })
    .then((content1) => {
        console.log(content1)
        return thenFs.readFile('./files/file2.txt', 'utf8')
    })
    .then((content2) => {
        console.log(content2)
        return thenFs.readFile('./files/file3.txt', 'utf8')
    })
    .then((content3) => {
        console.log(content3)
    })
2.2.3 Parallel Asynchronous Operations with Promise.all() and Promise.race()
Promise.all(): Waits for all promises to resolve before proceeding (waiting mechanism).Promise.race(): Proceeds as soon as any promise resolves (racing mechanism).
Code example:
import thenFs from 'then-fs'

const filePromises = [
    thenFs.readFile('./files/file3.txt', 'utf8'),
    thenFs.readFile('./files/file2.txt', 'utf8'),
    thenFs.readFile('./files/file1.txt', 'utf8'),
]

Promise.all(filePromises)
    .then(([result1, result2, result3]) => {
        console.log(result1, result2, result3)
    })
    .catch((error) => {
        console.log(error.message)
    })

Promise.race(filePromises)
    .then(([result1, result2, result3]) => {
        console.log(result1, result2, result3)
    })
    .catch((error) => {
        console.log(error.message)
    })
3. async and await
3.1 Introduction to async and await
Introduced in ES8, async/await simplifies Promise handling, replacing chain .then() calls.
3.2 Basic Usage of async and await
Use await for operations returning a Promise, and mark the containing function with async.
Code example:
import thenFs from 'then-fs'

async function fetchFiles() {
    const data = await thenFs.readFile('./files/file1.txt', 'utf8')
    console.log(data)
}
Notes:
- Functions using
awaitmust beasync. - In async functions, code before the first
awaitruns synchronously; code after runs asynchronously.
Example illustrating execution order:
import thenFs from 'then-fs'

console.log('A')
async function fetchFiles() {
    console.log('B')
    const data1 = await thenFs.readFile('./files/file1.txt', 'utf8')
    console.log(data1)
    const data2 = await thenFs.readFile('./files/file2.txt', 'utf8')
    console.log(data2)
    console.log('D')
}

fetchFiles()
console.log('C')
// Output order: A C B D
4. EventLoop
4.1 JavaScript as a Single-Threaded Language
JavaScript executes one task at a time, which can cause program freezes with long-running tasks.
4.2 Synchronous and Asynchronous Tasks
Tasks are divided into:
- Synchronous tasks: Non-time-consuming, executed in order on the main thread (e.g., file reading, data requests).
- Asynchronous tasks: Time-consuming, delegated to the host enviroment (browser/Node.js), with callbacks placed in a task queue upon completion.
4.3 Understanding the EventLoop
- Synchronous tasks execute first on the main thread.
- Asynchronous tasks are handled by the host environment; their callbacks go in to the task queue.
- After synchronous tasks finish, callbacks from the task queue are executed.
- This cycle repeats, forming the EventLoop.
Example:
import thenFs from 'then-fs'

console.log('A') // Synchronous
thenFs.readFile('./file.txt', 'utf8').then((res) => {
    console.log('B') // Asynchronous callback
})

setTimeout(() => {
    console.log('C') // Asynchronous with zero delay
}, 0)
console.log('D') // Synchronous
// Output order: A D C B
5. Macro-tasks and Micro-tasks
5.1 Overview of Macro-tasks and Micro-tasks
Asynchronous tasks are further split into:
- Macro-tasks: e.g.,
setTimeout,setInterval, I/O operations. - Micro-tasks: e.g., Promise callbacks,
process.nextTick.
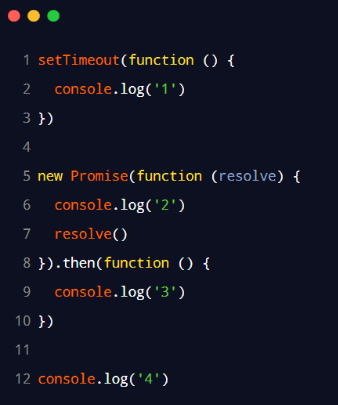
5.2 Execution Order of Macro-tasks and Micro-tasks
- Execute all synchronous tasks.
- Execute all micro-tasks.
- Execute macro-tasks.
- After each macro-task, check for pending micro-tasks and execute them before the next macro-task.
Summary order: script (main code) → micro-tasks (e.g., Promises) → macro-tasks (e.g., setTimeout).
Example diagram illustrating output order 2, 4, 3, 1: