Beautifying the macOS Terminal
In Unix-based operating systems (including Unix derivatives like Linux and macOS), the shell serves as a bridge between the user and the kernel. Users input shell commands—simple, memorable symbol identifiers—which the shell parses and forwards to the kernel for execution.
There are various types of shells. Zsh is one such shell, but it may not be the system default. Most Unix-like systems default to Bash.
1. Switch Default Shell to Zsh
Starting with macOS Catalina, the default shell is zsh.
- Check your current default shell with
echo $SHELL. - If its not
/bin/zsh, verify that/bin/zshis installed by inspecting/etc/shells. - If zsh is installed but not set as default, change it with
chsh -s /bin/zsh. (Restart the terminal for the change to take effect.)
$ echo $SHELL      # Check current default shell

$ cat /etc/shells  # List installed shells
/bin/bash
/bin/csh
/bin/dash
/bin/ksh
/bin/sh
/bin/tcsh
/bin/zsh

$ chsh -s /bin/zsh # Change default shell to zsh
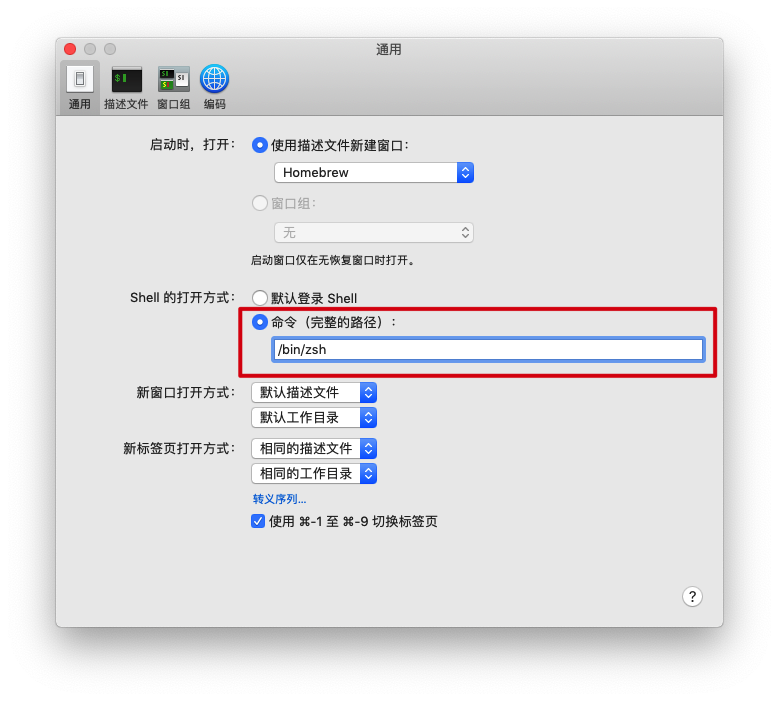
You can also change the shell via Terminal → Preferences → General by selecting a different shell under "Shells open with":
2. Install Oh My Zsh
$ sh -c "$(curl -fsSL https://raw.githubusercontent.com/ohmyzsh/ohmyzsh/master/tools/install.sh)"
# If the network is slow, use the Gitee mirror:
$ sh -c "$(curl -fsSL https://gitee.com/mirrors/oh-my-zsh/raw/master/tools/install.sh)"
3. Change Oh My Zsh Theme
Edit the configuration file and apply changes:
$ vim ~/.zshrc     # Modify ZSH_THEME
$ source ~/.zshrc  # Reload configuration
Replace the theme name in ZSH_THEME="robbyrussell" with another, for example agnoster. More themes can be found on the Oh My Zsh themes page.
3.1 Install Fonts
After switching to the agnoster theme, the terminal may show garbled characters because the theme requires special fonts from the powerline-fonts repository.
- Download the fonts:
$ cd ~/Downloads && git clone https://github.com/powerline/fonts.git
$ cd fonts && ./install.sh
$ cd && rm -rf ~/Downloads/fonts
- Set the font in Terminal preferences: choose a font whose name ends with "Powerline" (e.g., "DejaVu Sans Mono for Powerline"). The terminal display should then appear correctly.
3.2 Change Directory Color
In the agnoster theme, the directory arrow block is dark blue by default, which may be hard to read. The color is defined in the theme configuration file:
$ vim ~/.oh-my-zsh/themes/agnoster.zsh-theme
Find prompt_dir() and change the color from blue to cyan.
Note: The colors are standard ASCII colors:
white,black,yellow,cyan,magenta,blue,grey,green,red.
3.3 Hide Hostname
Edit the same theme file:
$ vim ~/.oh-my-zsh/themes/agnoster.zsh-theme
Modify prompt_context(). The default content inside the quotes is "%(!.%{%F{yellow}%}.)%n@%m", which displays username@hostname.
- To show only the hostname: change to
"%(!.%{%F{yellow}%}.)$HOST" - To show only the username: change to
"%(!.%{%F{yellow}%}.)$USER" - You can also add custom emojis inside the quotes.
- To hide both: replace the function with
prompt_context() {}.
prompt_context() {
	if [[ "$USERNAME" != "$DEFAULT_USER" || -n "$SSH_CLIENT" ]]; then
		# prompt_segment black default "%(!.%{%F{yellow}%}.)%n@%m"  # default: user@host
		# prompt_segment black default "%(!.%{%F{yellow}%}.)$HOST"  # host only
		prompt_segment black default "%(!.%{%F{yellow}%}.)$USER"  # user only
	fi
}
# To hide both user and host, make the function empty:
# prompt_context() {}
This change applies only to the agnoster theme. To apply it globally, add the prompt_context() function to ~/.zshrc. Adding export DEFAULT_USER=$USER to ~/.zshrc also hides both username and hostname.
4. Install Plugins
Warning: Installing many plugins can noticeably slow down terminal startup. Use them judiciously.
Plugins are installed under ~/.oh-my-zsh/custom/plugins.
4.1 Command Auto-Suggestion Plugin
Effect: Previously typed commands are shown as suggestions while typing; press the right arrow key to complete.
- Download:
$ git clone https://github.com/zsh-users/zsh-autosuggestions ${ZSH_CUSTOM:-~/.oh-my-zsh/custom}/plugins/zsh-autosuggestions
# Equivalent to:
# cd ~/.oh-my-zsh/custom/plugins
# git clone https://github.com/zsh-users/zsh-autosuggestions
- Configure:
$ vim ~/.zshrc
# Change plugins=(git) to:
# plugins=(git zsh-autosuggestions)
$ source ~/.zshrc
4.2 Syntax Highlighting Plugin
Effect: Correct comands are highlighted in green; incorrect ones appear in red.
$ git clone https://github.com/zsh-users/zsh-syntax-highlighting.git ${ZSH_CUSTOM:-~/.oh-my-zsh/custom}/plugins/zsh-syntax-highlighting

$ vim ~/.zshrc
# In the plugins array, add:
# plugins=(git zsh-autosuggestions zsh-syntax-highlighting)
$ source ~/.zshrc
5. Configure Vim
Here are some basic Vim settings:
$ vim ~/.vimrc
Add the following content:
" Enable syntax highlighting
syntax on
" Show line numbers
set nu
" Highlight search results
set hlsearch
" Show cursor position in status line
set ruler

" Inherit indentation from previous line
set autoindent
" More intelligent indentation
set smartindent
" Set tab width to 4 spaces
set tabstop=4
" Set indentation width to 4 spaces
set shiftwidth=4
