Comprehensive Guide to Installing and Configuring Anaconda
Table of Contents
- What Is Anaconda?
- Choosing an Installation Scenario 2.1 Fresh Python Environment 2.1.1 Downloading Anaconda 2.1.2 Verifying the Installation 2.1.3 Switching the Package Source 2.1.4 Updating Packages 2.1.5 Creating and Managing Virtual Environments 2.2 Preserving an Existing Python Installation 2.2.1 Approach One: Renaming Python Executables 2.2.2 Approach Two: Using Conda Environments
- Conclusion
1. What Is Anaconda?
Anaconda bundles Conda, Python, and numerous pre‑installed libraries such as numpy, pandas, and others. The main advantages of installing Anaconda are:
-
Conda included: Conda is an environment and package manager. Its capabilities are implemented via Conda packages. Can you use pip to install Conda packages and replicate Conda’s environment management? No—Conda packages depend on the Conda environment manager itself. For a deeper comparison, refer to community discussions like the one on Zhihu.
-
Ready‑to‑use toolkit: Anaconda ships a base Python version tied to the Anaconda release. That Python environment already contains many scientific computing libraries, saving you the effort of installing them one by one with pip.
-
Multi‑version Python management: You can create and switch between different Python versions. For example, if a new project requires a version different from the base Python supplied by Anaconda, Conda makes side‑by‑side management straightforward.
2. Choosing an Installation Scenario
There are two typical starting points:
- Scenario A: No Python currently installed, or you are willing to remove the existing one before installing Anaconda.
- Scenario B: Python is already installed on your machine and you want to keep it.
2.1 Scenario A: Fresh Python Environment
2.1.1 Downloading Anaconda
Select the installer matching your operating system (32‑bit or 64‑bit). The official website can be slow; the Tsinghua University mirror is recommended. The version used in this guide is:
Anaconda3-5.2.0-Windows-x86_64.exe
Why not a newer version such as Anaconda3-5.3.1-Windows-x86_64.exe? Several users—including the original author of this guide—encountered an error during package installation or virtual environment creation with the newer release:
The procedure entry point OPENSSL_sk_new_reserve could not be located in the dynamic link library E:\ProgramData\Anaconda3\Library\bin\libssl-1_1-x64.dll
Reverting to version 5.2.0 resolved the issue.
After downloading, double‑click the installer. Pay attention to these steps:
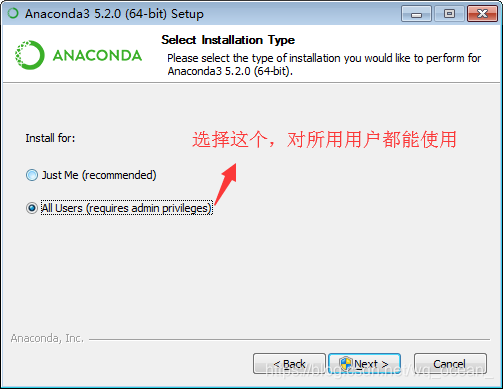

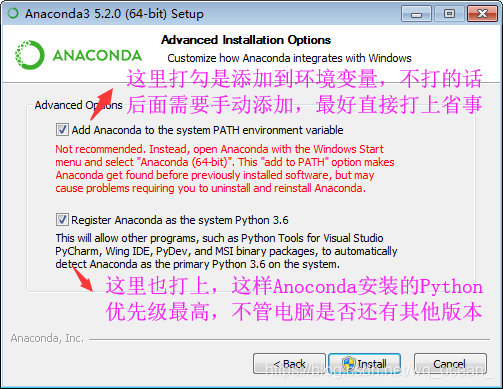


Click Finish once the setup completes.
2.1.2 Verifying the Installation
Open a command prompt and run:
conda --version
If you see something similar to the following, the installation was successful:

2.1.3 Switching the Package Source
Using conda install <package-name> is convenient, but the default server is located abroad, resultign in slow downloads. The Tsinghua University mirror provides a much faster alternative. To switch:
Method 1: Execute the commands below in a terminal:
conda config --add channels https://mirrors.tuna.tsinghua.edu.cn/anaconda/pkgs/main/
conda config --set show_channel_urls yes
Navigate to your user directory (e.g., C:\Users\User) and open .condarc. It should look like:
ssl_verify: true
channels:
  - https://mirrors.tuna.tsinghua.edu.cn/anaconda/pkgs/free/
  - defaults
show_channel_urls: true
Method 2: Open .condarc directly and paste the above content.
2.1.4 Updating Packages
Updating can take a while; consider doing it when you have spare time. While not strict required, it helps avoid future conflicts. To update:
First update Conda itself:
conda update conda
Then update all packages:
conda upgrade --all
2.1.5 Creating and Managing Virtual Environments
Under Scenario A the installation is essentially complete. Virtual environment usage will be covered in Scenario B below.
2.2 Scenario B: Preserving an Existing Python Installation
The Anaconda installation process is the same as in Scenario A. Extra steps are required after installation to keep your existing Python functional. Two approaches exist, with Approach Two recommended.
2.2.1 Approach One: Renaming Python Executables
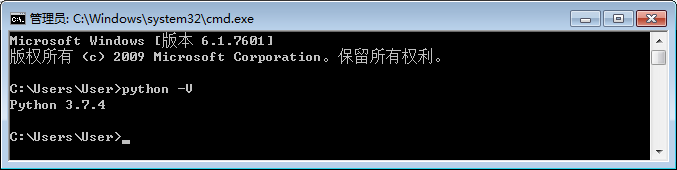
Anaconda ships its own Python. Before installation, check the version of your existing Python (referred to as native Python):
python --version
# or
python -V
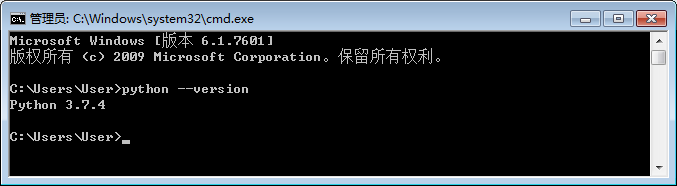
In this example the native Python version is 3.7.4. The PATH environment variable includes entries such as:
C:\ProgramFiles\Python37\Scripts\;
C:\ProgramFiles\Python37\;
%SystemRoot%\system32;
%SystemRoot%;
%SystemRoot%\System32\Wbem;
%SYSTEMROOT%\System32\WindowsPowerShell\v1.0\;
C:\Program Files\PuTTY\
After installing Anaconda, run:
python --version
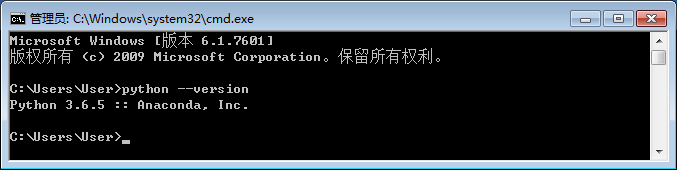
The output shows 3.6.5, which is the Python version bundled with Anaconda. Looking at the updated PATH reveals:
C:\ProgramData\Anaconda3;
C:\ProgramData\Anaconda3\Library\mingww64\bin;
C:\ProgramData\Anaconda3\Library\usr\bin;
C:\ProgramData\Anaconda3\Library\bin;
C:\ProgramData\Anaconda3\Scripts;
C:\ProgramFiles\Python37\Scripts\;
C:\ProgramFiles\Python37\;
%SystemRoot%\system32;
%SystemRoot%;
%SystemRoot%\System32\Wbem;
%SYSTEMROOT%\System32\WindowsPowerShell\v1.0\;
C:\Program Files\PuTTY\
The native Python paths still exist, but Anaconda’s entries are placed before them. Because of PATH priority, python resolves to Anaconda’s Python. If you reversed the order, python --version would return the native version:
C:\Program Files\Python37;
C:\ProgramFiles\Python37\Scripts\;
C:\ProgramData\Anaconda3;...
Therefore, Approach One suggests renaming python.exe in your native Python installation to something like python_ori.exe. Then, calling python invokes Anaconda’s interpreter, while python_ori invokes the native one.
2.2.2 Approach Two: Using Conda Environments
This method leverages Conda’s virtual environment capabilities, keeping both interpreters neatly separated.
- Create a new environment that matches your native Python version. For example, if your native Python is 3.7.4:
conda create -n py37 python=3.7.4
- Activate the environment when you need the native‑like Python:
conda activate py37
- Verify the version:
python --version # Should output 3.7.4
- When you want to return to the base Anaconda Python, simply deactivate:
conda deactivate
This approach keeps both Pythons isolated without renaming any executables and is the cleaner, more maintainable solution.
3. Conclusion
You have installed Anaconda, configured a domestic mirror for faster downloads, updated packages, and learned how to coexist with an existing Python installation. The recommended workflow is to rely on Conda environments for managing multiple Python versions. If you encounter the OPENSSL_sk_new_reserve error, consider using the Anaconda 5.2.0 installer as a stable alternative.
Happy coding!
